Double Chocolate Zucchini Bread


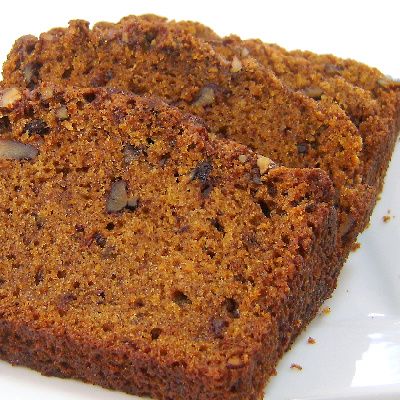
When things are quiet here, I browse through food blogs the way others do magazines. I admire some and learn from others, always gleaning tips and tidbits that have the potential to make our next meal something really special. As a result, my bookmark folder is an embarrassment of riches that I'd be ashamed to let others see. While not talking numbers, I can happily report that I'm now current through the summer of 2009. While it took a while, I was finally able to make this wonderful Double Chocolate Zucchini Bread, originally featured at Baking Bites that summer. If you're not familiar with the site, stop by and see what's happening. You'll be happy that you did. This lovely cake-like bread was worth waiting for. It is moist. It is flavorful. It is chocolate. I know you'll love it, so rather than gab I'll get right to it. Here's the recipe for one of the best zucchini breads I've ever had. I did say chocolate, didn't I?


Double Chocolate Zucchini Bread
...from the kitchen of One Perfect Bite, courtesy of Baking Bites

Ingredients:
2 cups all purpose flour
1/2 cup unsweetened cocoa powder, sifted
1 cup sugar
2 teaspoons baking powder
1/2 teaspoon salt
2 large eggs
1/3 cup vegetable oil
3/4 cup buttermilk
1 teaspoon vanilla extract
2 medium zucchini, shredded to equal 1-1/4 cups
1 cup chocolate chips

Directions:
1) Preheat oven to 350F. Lightly grease a 9×5-inch loaf pan. Set aside.
2) Sift flour, cocoa powder, sugar, baking powder and salt into a large bowl.
3) Whisk eggs, vegetable oil, buttermilk and vanilla together in a medium bowl.
4) Add wet to dry ingredients and stir until almost fully combined. Add zucchini and chocolate chips and stir until evenly distributed in batter (batter should be fairly thick).
5) Bake for 50-55 minutes, or until a toothpick inserted into center comes out clean or with only moist crumbs attached. Turn loaf out of pan and cool on a wire rack before slicing. Yield: 1 loaf.

You might also enjoy these recipes:
Chocolate Zucchini Cake - One Perfect Bite
Double Chocolate Zucchini Bread (Low Card Gluten Free) - All Day I Dream About Food
Chocolate Zucchini and Sweet Potato Bread - Anna's Table
Chocolate Zucchini Muffins - Cookie Madness
Vegan Chocolate Banana and Zucchini Bread - Anja's Food 4 Thought
Chocolate Zucchini Bread - Closet Cooking
Chocolate Zucchini Spelt Cake - Anja's Food 4 Thought

Clam Fritters


From the kitchen of One Perfect Bite...I found this recipe several weeks ago while searching for dishes that would allow me to use the large cans of chopped clams found in warehouse stores. It was originally developed by Craig Claiborne, a prolific food writer and editor at The New York Times. He called the recipe Bonacker-Style Clam Fritters and considered it to be a perfect example of authentic American cooking. Bonacker is the name given to natives of the East Hampton, Long Island. Fortunately, this dish had been featured at Saveur.com and I was able to retrieve the original recipe from their files. I wanted to make the dish as it was written, the only substitution being the use of canned for fresh clams. The most difficult part of this exercise was determining how much meat would actually be harvested from 4 dozen cherrystone clams. Available search engines failed me, so I splashed water on my face, put on some lipstick and went for a chat with my guys at the fish market. Based on the assumption that all the cherrystones were the same middling size, the guys were certain - certain mind you - that I'd need 2-1/2 cups of chopped canned meat to equal the amount that I'd get from freshly shucked clams. It, of course, took another 20 minutes to explain why I was going through the exercise in the first place and by the time I left the market I wasn't quite sure why myself. At any rate, I made it home and we had great fritters for dinner. These are less doughy than most I've had and I really enjoyed them. I think you might too. Here's the recipe.

Clam Fritters (Bonacker-Style Clam Fritters)...from the kitchen of One Perfect Bite, courtesy of Craig Claiborne and Saveur

Ingredients:
1 cup all-purpose flour
1 teaspoon baking soda
2 teaspoons baking powder
2 eggs
1 tablespoon lemon juice
1⁄3 cup clam juice
1⁄4 cup milk
1 tablespoon melted butter
Pinch cayenne
2 tablespoons finely chopped fresh parsley
2-1/2 cups coarsely chopped, drained clams
Salt and freshly ground black pepper
Vegetable oil

Directions:
1) Sift together flour, baking soda, and baking powder in a mixing bowl. Whisk in eggs, lemon juice, clam juice, milk, butter, and cayenne, whisking until batter is smooth. Add parsley and clams, then season with salt and pepper. Mix well.
2) Add vegetable oil to a heavy skillet, to a depth of 1⁄8-inch, and heat over medium heat. When oil is hot but not smoking, spoon about 2 tablespoons of clam batter for each fritter into hot oil. (Work in batches and avoid crowding pan.) Fry until golden on one side, then turn fritters and continue frying about 2 minutes more. Make sure fritters are cooked through. Drain on paper towels. Season to taste with salt and pepper. Yield: 16 fritters.

You might also enjoy these recipes:
Linguine and Clams with Garlic White Wine Sauce - The Red Spoon
Cuban Clam Fritters with Cilantro Mayo - Lazaro Cooks
Spaghetti Frutti di Mare - Cooking-Gallery
Clams and Mussels in Tomato Broth - Mangiandobene
Clams with Green Peppers Tomatoes and Wine - My Mediterranean Diet
Karin's Curried Clam Pie - Pithy and Cleaver
Italian White or Red Seafood Chowder - What's Cookin' Italian Style Cuisine

Roasted Red Pepper and Tomato Soup - Pink Saturday


From the kitchen of One Perfect Bite...This soup is a wonderful way to use the last of summers bounty. It's flavorful, quite easy to assemble and its wonderful color belongs on an artist's palette. The only downside to all this is that you'll need a blender or food processor to puree the vegetables. If you are fastidious you'll also want to pour the soup through a fine mesh strainer to capture those odd bits and bobs that escape the blender blades. The soup can be served warm or cold and it's perfect to pack in a thermos to offer as a warmer at the game. I prefer to serve the soup warm, but it was actually developed to be served cold. Remember cold soups require more salt than those that are served warm, so adjust seasonings accordingly. Hot or cold the soup should be allowed to rest and ripen before it is served. I think you'll enjoy this. Here's the recipe.

Roasted Red Pepper and Tomato Soup...from the kitchen of One Perfect Bite

Ingredients:
2-1/4 pounds Roma tomatoes, halved lengthwise
3 large red bell peppers, quartered, seeded
1 onion, cut into thin wedges
4 large garlic cloves, peeled
2 tablespoons extra virgin olive oil
1 teaspoon fresh thyme leaves or 1/2 teaspoon dried
2 cups water (approximate measure)
Heavy cream (optional)
Fresh thyme sprigs (optional)

Directions:
1) Preheat oven to 450°F. Arrange tomatoes (cut side up), bell peppers, onion and garlic cloves on large baking sheet. Drizzle oil over; sprinkle generously with salt and pepper. Roast vegetables until brown and tender, turning peppers and onion occasionally, about 40 minutes. Remove from oven. Cool.
2) Transfer vegetables and any accumulated juices to processor. Add thyme leaves. Puree soup, gradually adding enough water to thin soup to desired consistency. Chill soup for 3 to 24 hours. Reheat if serving warm. If soup becomes too thick, thin with additional water.
3) Adjust seasoning. Ladle soup into bowls. Drizzle with heavy cream if desired. Garnish with thyme sprigs, if using. Yield: 4 servings.

You might also enjoy these recipes:
Bacon and Potato Soup - Yum Sugar
Black Bean and Pumpkin Soup - Smitten Kitchen
Split Pea Soup with Pancetta - Bread and Honey
Spinach White Bean and Turkey Sausage Soup - Closet Cooking
Pureed Sweet Potato Soup - Saveur
Bacon and Cabbage Soup - Epicurious


This post is being linked to:
Pink Saturday, sponsored by Beverly at How Sweet the Sound.

"I didn't summit but...

...Mt. Everest touched my heart." Bob and I took an aerial tour of the Himalayas this morning and Mt. Everest and I are kissing cousins. It was an indescribable experience. An old pilot in our group also reminded us that we all had lived to die another day. The landing did not please him. We are in Nepal. The food is terrible but the valley is one of fascinating contrasts. Yesterday we were able to see the Living Goddess and her temple. She is a seven year old girl chosen in much the same way as the Dalai Lama. It was a fascinating peek into the culture and beliefs of the people here. We remain in Kathmandu for another two days before moving on to visit a Sherpa village and beginning a wildlife safari. Many of you have asked who arranged the tour we are taking. The group is called Road Scholars and I heartily recommend it to all who love to travel.I hope you all are well. Blessings...Mary

Chocolate Peanut Crinkles


From the kitchen of One Perfect Bite...This cookie recipe kept making the rounds and each time I saw it I became "curiouser and curiouser." Chocolate crinkles, I call them snowballs, are a favorite of mine, so it was only a matter of time before I actually tried the recipe. It was developed by Bill Yosses, a White House pastry chef, and I wanted to see how his cookies differed from the old classic I've grown to love. They are, indeed, different. Their texture is far more cakelike than what I'm familiar with. They are also huge in size. Whether that's good or bad is a subjective call. The nuts add a subtle taste to the finished cookie, but they don't overpower the chocolate, and the bit of added texture they provide is not unpleasant. I'm glad I made these cookies, though I don't plan on making them them again. They are delicious to be sure, but delicious comes on a sliding scale. The classic recipe I use can be found here. I think it makes a better cookie. I don't want to dissuade you from trying Chocolate Peanut Crinkles. Your opinion my differ from mine. Here's the recipe.

Chocolate Peanut Crinkles...from the kitchen of One Perfect Bite, courtesy of Bill Yosses and Melissa Clark

Ingredients:
2/3 cup toasted, skinned unsalted peanuts
2 tablespoons granulated sugar
6 ounces bittersweet chocolate, coarsely chopped
2-3/4 cup all-purpose flour
2 tablespoons Dutch-processed unsweetened cocoa powder
2 teaspoons baking soda
3/4 teaspoon salt
1-1/2 cups light brown sugar
8 tablespoons unsalted butter, softened
2 large eggs, room temperature
1/4 cup whole milk
1 teaspoon pure vanilla extract
3/4 cup confectioners’ sugar

Directions:

1) Place nuts and granulated sugar in bowl of a food processor fitted with a blade attachment. Pulse to finely chop.
2) Melt chocolate in the top of a double boiler set over a pot of simmering water.
3) Sift flour, cocoa powder, baking soda and salt together in a large bowl. Place butter and brown sugar in bowl of an electric mixer fitted with a paddle attachment. Cream until light and fluffy. Add eggs, one at a time, until incorporated. Beat in the melted chocolate, stopping mixer to scrape down sides before beating again. Mix in milk and vanilla. Add flour mixture in three additions, and mix until just combined. Fold in nuts.
4) Form dough into a ball and cover tightly with plastic wrap. Refrigerate dough for 3 hours or overnight.
5) When you are ready to bake, preheat oven to 350°F. Line two baking sheets with parchment paper, or lightly butter them, and set aside.
6) Place confectioners’ sugar in a wide, shallow bowl. Scoop out a heaping tablespoon of dough and roll into a ball. Coat generously with sugar and transfer to a baking sheet, placing them at least 2-inches apart. Repeat with remaining dough and sugar.
7) Bake cookies, turning sheets from back to front and swapping racks halfway through, until cracked but not completely firm, 12-15 minutes. Cool cookies on the sheets for about 2 minutes, then use a spatula to transfer to wire racks to cool further. They may be stored airtight at room temperature for up to 2 days. Yield: 3-1/2 dozen.

You might also enjoy these recipes:
Chocolate Cookies n' Cream Cookies - Baking Bites
Dark and Bitter Orange Chocolate Cookies - The Technicolor Kitchen
Flourless Peanut Chocolate Cookies - Culinary in the Country
Double Chocolate Dream Cookies - Cookie Madness
Chocolate Sables: World Peace Cookies - Deep South Dish
Triple Chocolate Cookies - Une Gamine dans la Cuisine
Totally Chocolate Chocolate Chip Cookies - Sweet and Savory Tooth
Thick and Chewy Triple Chocolate Cookies - Brown Eyed Baker

Fusilli with Spinach and Ricotta


From the kitchen of One Perfect Bite...This is a wonderfully mild pasta that's light and easy on the palate. It's flavors are much like those found in spinach and cheese ravioli, but this deconstructed version is much less work. It's perfect for those evenings when you have a yen for pasta but your stomach can't quite handle a heavy spicy sauce. It really is quite easy to prepare, but it's not a pantry meal. The recipe requires fresh greens and, if possible, fresh ricotta. That means advanced planning is needed to make this dish properly. Lidia Bastianich developed the recipe on which mine is based. I've made some changes because I thought the original dish had too little sauce for the amount of pasta that was cooked. I also use more salt in the pasta water to assure it has some flavor. I generally add 1 teaspoon of salt for every quart of water in my pasta pot. I use a 6 quart pot, so I always add 2 tablespoon of salt to the pasta water. I add the salt after the water comes to a boil and I let the water return to a boil before I add the pasta. Shirley Corriher has written an article about the art and science of cooking pasta that you might find interesting. It can be found here. This is a lovely pasta to have in your rotation. You won't make it as often as some others, but it will not disappoint you. Here's the recipe.

Fusilli with Spinach and Ricotta...from the kitchen of One Perfect Bite adapted from a recipe by Lidia Bastianich

Ingredients:

Kosher salt
1 pound baby spinach, washed and patted dry
2 tablespoons extra-virgin olive oil
4 small scallions, chopped
Freshly ground black pepper
1 cup ricotta cheese
1 cup half-and-half or light cream
Pinch nutmeg
1 tablespoon unsalted butter
12 ounces dried fusilli
1/2 cup freshly grated Parmigiano-Reggiano

Directions:
1) Bring 6 quarts of water to a boil. Add 2 tablespoons salt to boiling water.
2) Stacking leaves, cut spinach crosswise into 1/4-inch strips. You should have 8 packed cups of shredded spinach.
3) Heat olive oil in a large pan or skillet set over medium-high heat. Add scallions and cook, stirring, until softened, about 5 minutes. Stir spinach and a pinch of salt and pepper into pan. Cover and steam spinach, stirring occasionally to cook evenly, until it's wilted but still bright green, about 5 minutes.
4) Meanwhile, in a small bowl, mix ricotta, half-and-half, and nutmeg, if using, until smooth. Stir ricotta mixture and butter into spinach and season with salt and pepper. Reduce heat to medium-low and simmer for 5 minutes.
5) Meanwhile, stir fusilli into boiling water and cover pot. When water returns to a boil, remove cover. Cook pasta, stirring occasionally, until al dente, about 12 minutes.
6) Reserve 1/2 cup of pasta cooking liquid. Drain pasta well and return it to its pot over low heat. Add spinach mixture and enough reserved cooking liquid to make a sauce that will lightly coat pasta. Toss thoroughly. Remove pot from heat and stir in grated cheese. Transfer pasta to a warm serving platter or individual bowls and serve. Yield: 6 servings.

You might also enjoy these recipes:

Pasta with Spinach and Asiago Cream Sauce - Good Things Catered
Heart Healthy Pasta with Spinach Sauce - What's for Dinner Across State Lines
Garden Pasta with Ricotta - Radishes and Rhubarb
Penne with Ricotta and Basil Sauce - My Fabulous Recipes
Malfalda Pasta with Ricotta Cheese - Anna's Table
Roasted Zucchini Pasta with Ricotta Cheese - Foodie/Nutritionist

Camel Caravan

We are about to leave Rajasthan and head on to Nepal. There have been many stops between Delhi and this location, including the city of Agra and the beautiful Taj. Bob and I spent several days visiting small villages in this state. Our means of transportation was camel. Seriously! We stayed in a lovely hunting camp and would head out from there each morning to see what many call the "real" India. My camel and I made a quiet peace with each other - eventually. The camels were actually a more comfortable ride than the jeeps or wagons we also could use. We've had two other cooking lessons and been to visit local village schools. It is an eye opening experience. We've seen this before in other countries but it is always a reminder how fortunate our children are. Never forget to bless the womb that bore you. Hugs and blessing...Mary

Warm Black Bean Dip


From the kitchen of One Perfect Bite...I love to make this dip for Friday movie nights or watching weekend games. It's one of those dishes that everyone seems to love and you'll never have to worry about leftovers when you serve it. It is really easy to make and involves little more than opening cans and thawing vegetables. It can be made in advance and then baked just before you want to serve it. Serve it with warm tortilla chips and your guests will follow you anywhere. To warm chips, spread them in a single layer on a cookie sheet or baking pan and bake in a 350 degree F. oven for about 5 minutes. Dump them into a bowl and serve, repeating as often as is necessary. The recipe was developed by Tony Rosenfeld for Fine Cooking magazine. I have made only minor changes to his creation. Specifically, I use less vinegar than he calls for. Here's the recipe.

Warm Black Bean Dip...from the kitchen of One Perfect Bite courtesy of Tony Rosenfeld

Ingredients:
2 tablespoons extra-virgin olive oil + more for baking dish
2 medium tomatoes, cored and cut into medium dice
2 teaspoons kosher salt, divided use
1 large yellow onion, finely diced
3 large cloves garlic, minced
1 tablespoon chili powder
2 (15.5-oz.) cans black beans, rinsed and drained well
2 canned chipotles en adobo, minced (about 1 tablespoon), plus 3 tablespoons adobo sauce from can
1 to 3 tablespoons cider vinegar
1-1/2 cups fresh or frozen corn kernels (if frozen, thaw first)
1-1/2 cups (6 oz.) grated sharp cheddar cheese
1-1/2 cups (6 oz.) grated Monterey Jack cheese
3/4 cup chopped fresh cilantro
Freshly ground black pepper
Tortilla chips for serving

Directions:
1) Heat oven to 425 degrees F. Grease a 1-1/2 qt. baking dish with oil and line a baking sheet with foil. Set the tomatoes in a colander over the sink and sprinkle with 1 teaspoon salt.
2) Heat oil in a large (12-inch) skillet over medium-high heat until shimmering hot. Reduce heat to medium, add onion, sprinkle with reserved 1 teaspoon salt, and cook, stirring, until softened and translucent, about 4 to 6 minutes. Add garlic and chili powder and cook, stirring, for 1 minute. Add half of black beans, chipotles and adobo sauce, and 3/4 cup water and bring to a boil. Cook until liquid reduces by about half, 2 to 3 minutes.
3) Transfer bean mixture to a food processor, add vinegar (I used only 1 tablespoon), and process until smooth. Let cool for a couple of minutes and then transfer to a large bowl. Add rest of beans, tomatoes, corn, half of each of cheeses, and 1/2 cup of cilantro. Mix well and season to taste with salt and pepper.
4) Transfer to baking dish and sprinkle with remaining cheese. Bake on a foil-lined baking sheet (to catch drips) until cheese melts and browns around edges, about 15 minutes (longer if refrigerated). Sprinkle with remaining cilantro and serve with warm tortilla chips for dipping.
Yield: 10 to 12 servings.

You might also enjoy these recipes:
Spicy White Bean Dip - Never Enough Thyme
Hot Clam Dip - One Perfect Bite
Bleu Cheese and Bacon Dip - Easy Appetizers
Mississippi Sin Dip - Deep South Dish
Edamame Dip - The Baking Barrister
Pan Fried Onion Dip - Brown Eyed Baker
Roasted Eggplant Dip - Melbo's Toast
Cucumber Yogurt Dip - Eclectic Recipes
Homemade Onion and Herb Dip - What's Cookin, Chicago

Double Celery Soup


From the kitchen of One Perfect Bite...This is a light soup, but it is also substantial enough to be filling. A bit of a contradiction I know, but it really is a perfect soup to fill stomachs while bridging the seasons. When it's too cold for gazpacho, but too warm for a heavy bean soup, you'll be glad to have this recipe in your rotation. I must admit this soup surprised. I made it only because a neighbor had left celeriac on our porch and I had to figure out a way to use it. I have a handful of food writers that I go to when I'm exposed to new ingredients. Patricia Wells is one of them, and, sure enough, she had just what I was looking for. You can have this soup on the table in a little over an hour. You'll be delighted with it's flavor and its texture and you'll be especially pleased by how quickly it comes together. Celeriac, or celery root, is not always available in my community, so I snatch it up when I can get my hands on it. The root doesn't freeze well, but the soup does, so I usually make a double batch to assure I have some on hand. While there are herbs that add to the length of the ingredient list, the soup is made with just four real ingredients. It has made it to my top ten (soup) list and that doesn't happen often. I hope you'll try it. I know it sounds bizzare, but it is really, really good. Here's the recipe.

Double Celery Soup...from the kitchen of One Perfect Bite, courtesy of Patricia Wells

Ingredients:
1 medium celery root (about 1 pound) peeled and diced
10 celery ribs, cubed
3 leeks (about 9 ounces) trimmed, well rinsed and cut into thin rounds
Bouquet garni: 1 large sprig of thyme, 3 bay leaves, several sprigs of parsley, tied with a string
2 quarts (2 liters) chicken stock
Salt and freshly ground pepper
A handful of chopped fresh herbs for garnish: including chervil, chives, flat-leaf parsley

Directions:
In a large saucepan, combine celery root, celery, leeks, and bouquet garni. Add stock, and season gently with salt and pepper. Bring to a simmer over medium-high heat.Simmer until the vegetables are soft, about 25 minutes. Adjust the seasonings. Pour into warmed shallow bowls. Sprinkle with the chopped herbs and serve immediately. Yield: 6 to 8 servings.

You might also enjoy these recipes:
Roasted Butternut Squash Bisque - Petit Foodie
Pumpkin, Barley and Sage Soup - Noble Pig
Roasted Pumpkin Soup - Gourmet Girl
Creamy Tomato Basil Soup - Louanne's Kitchen
Tomato Leek Soup - Living the Gourmet
Creamy Tuscan Bean Soup - Italian Food Forever

Pumpkin Pecan Bread with Streusel Topping


From the kitchen of One Perfect Bite...While spring is my favorite season, I love the aromas that drift from the fall kitchen. This bread is wonderfully fragrant and it's as tasty as its aroma promises. While it is delicious, I must warn you the bread is very sweet and that may be off-putting to some. The recipe was develop by Rebecca Rather, of Rather Sweet Bakery and Cafe, and it can be found in her The Pastry Queen cookbook. The recipe makes two loaves of bread or enough muffins to feed the third world. Properly rapped the breads stays fresh for days and it freezes beautifully. I have several loaves in the freezer waiting for meetings and coming holiday parties. It is very easy to prepare and can be made without special equipment. The bread was new to me this season and I consider it to be a wonderful addition to my fall kitchen. Here's the recipe.

Pumpkin Pecan Bread with Streusel Topping ...from the kitchen of One Perfect Bite, courtesy of Rebecca Rather

Ingredients:
Bread
1-1/2 cups pecan pieces, divided use
1 cup vegetable oil
3 cups sugar
4 large eggs
1 (15 ounce) can pure pumpkin
1 cup water
3 cups all purpose flour
2 teaspoons baking soda
1-1/2 teaspoons ground nutmeg
1-1/2 teaspoons ground allspice
1-1/2 teaspoons ground cinnamon
1-1/2 teaspoons ground cloves
1/2 teaspoon salt
Topping
1/2 cup firmly packed golden brown sugar
1/4 cup (1/2 stick) unsalted butter, melted and slightly cooled
2 teaspoons ground cinnamon
1/2 cup toasted pecan pieces (above)

Directions:
1) To make bread: Preheat oven to 350 degrees F. Arrange pecans on a baking sheet in a single layer and toast them in oven for 7 to 9 minutes, until golden brown and aromatic. Reserve 1/2 cup of toasted pecans for topping.
Grease two 9 by 5-inch pans or 36 standard-size muffin cups with butter or cooking spray.
Whisk oil and sugar in a large bowl. Add eggs, pumpkin, and water and whisk until combined. Stir in flour, baking soda, spices, and salt. Gently stir in 1 cup of the pecan pieces. Divide batter evenly between two pans or fill muffin pans almost to top with batter.
2) To make the topping: Stir sugar, butter, cinnamon, and the reserved 1/2 cup of pecan pieces in a medium bowl. Sprinkle topping liberally over the loaves or the muffins before baking.
3) To bake: Bake the loaves for 1 hour, or until a toothpick inserted into center comes out clean. Bake muffins for 30 to 35 minutes.

You might also enjoys these recipes:
Raw Apple Bread - Living the Gourmet
Apple Caraway Bread - Eclectic Recipes
Okanagan Apple Bread - One Perfect Bite
Pumpkin Apple Bread - One Perfect Bite
Pumpkin Chocolate Chip Bread - Two Peas and Their Pod
Pumpkin Molasses Bread - Tasty Eats at Home
Walnut Topped Pumpkin Bread - LA Easy Meals
Pumpkin Bread with Raisins and Pecans - That's Not What the Recipe Says
Pumpkin Bread with Dried Cranberries - No Fear of Entertaining

Buffalo-Style Hot Wings


From the kitchen of One Perfect Bite...First a little history. For years, chicken wings, along with backs and necks and gizzards, were considered food for the poor or relegated to the stockpot and used to flavor soup. That changed in October of 1964 when Teresa Bellissimo, owner of the Anchor Bar in Buffalo, New York, created a late night snack for her son and his friends. She fried up a bunch of wings and dipped them in a buttery hot sauce before serving them with celery and a blue cheese dressing. Her original recipe can be found here. The wings became an instant hit and thus was history writ. Today the Anchor Bar sells 70,000 thousand pounds of wings a month. Who knew?

There's no way to pretend that these are good for you, so I'll make no attempt to do that. I rarely make Buffalo-style wings because I know how unhealthy they are, but when I do fix them I want the genuine article. I'd rather have them once a year in all their awfulness than have a doctored version of them more frequently. Good or bad, Bob and I find it easier to practice avoidance than to take shortcuts with certain recipes. Dishes that are new to the table comply with all known healthy cooking practices, but I refuse to touch old favorites. Now that you've read my warning label, it's time to move onto the recipe. Please take out your deep fryers. Here's my recipe for Buffalo-style chicken wings.


Buffalo-Style Hot Wings...from the kitchen of One Perfect Bite and bars across America

Ingredients:
1 cup all-purpose flour
1 teaspoon salt salt
1/2 teaspoon paprika
1/2 teaspoon garlic powder
1/4 teaspoon cayenne pepper
1/4 teaspoon black pepper
20 chicken wing segments
1/2 cup butter
1/2 cup hot sauce

Directions:
1) Combine flour, salt, paprika, garlic powder, cayenne and black pepper in a pie plate.
2) Coat each wing segment with seasoned flour and refrigerate for 1 hour. Coat again with seasoned flour.
3) Heat butter and hot sauce in a small sauce until butter melts. Turn heat to lowest possible setting to keep mixture warm.
4) Bring oil in a deep fryer or stovetop equivalent to 375 degrees F. Deep-fry chicken in two or three batches, turning once for about 6 minutes per side. Quickly transfer chicken to a wire rack. Let sit for 30 seconds, then toss in hot sauce. Remove from sauce with a slotted spoon to a warm serving platter. Repeat until all chicken is fried. Serve hot with celery sticks and blue cheese dressing. Yield: 4 servings.

You might also enjoy these recipes:
Honey Baked Teriyaki Chicken Wings - Ordinary Recipes Made Gourmet
Saucy Poppers - Shamrocks and Shenanigans
Chipotle Sweet Potato Fries - The Active Foodie
Cajun Popcorn Shrimp - Life's Ambrosia
Pig's In Blankets - Gonna Want Seconds
Toasted Spicy Pumpkin Seeds - My Life Runs on Food

DAD


found this old picture of my dad and his band on tour in thailand

Cinnamon Candy Apples - Pink Saturday


From the kitchen of One Perfect Bite...It's hard to imagine a fall harvest without candied apples. While caramel apples have become more popular, the cinnamon variety predates them by 50 years. Candied apples were created at the turn of the 20th century by William Kolb, a New Jersey candy maker. He made them to use as part of his Christmas display and they rapidly became popular with his customers. His approach was simple. He dipped apples into a candy made from sugar, corn syrup, red dye and cinnamon oil. As the candy hardened it formed a glistening shell around the apple and the candied apple as we know it was born. The apples are still prepared in this way. If you are comfortable working with a candy thermometer you'll find these easy to make. There are, however, a few pitfalls that you want to avoid. For openers, make sure your apples are wax free. Since this is not a recipe that can be tasted as it cooks, be generous with the amount of flavoring you use up front. You should be able to find bottled cinnamon flavoring in the spice aisle of major grocery chains. It can also be ordered online. Make sure you use a pot that is deep enough to allow dipping the apples and that sticks inserted into the apples are strong enough to hold them. If the syrup becomes too thick don't be afraid to reheat it and when you're finished dipping, make sure you put the apples down on a buttered baking sheet or parchment paper. Wax paper will melt. Finally, these are best eaten within 24 hours of making. Their appearance begins to deteriorate after that. This recipe will make enough syrup to coat 12 small apples. It may be doubled. Here's the recipe.

Cinnamon Candy Apples...from the kitchen of One Perfect Bite inspired by Paula Deen

Ingredients:
1 cup water
1/2 cup corn syrup
2 cups sugar
1 teaspoon cinnamon flavoring
1 teaspoon red coloring
1 dozen wooden craft sticks
1 dozen small firm apples

Directions:
Boil water, syrup, and sugar together until a brown caramel color is reached (at about 250 degrees F on a candy thermometer). Remove from heat and add cinnamon and red coloring. Cool slightly. Meanwhile force a stick into the core of each apple. Dip apples 1 at a time into heavy red syrup, drain well, and place on a buttered baking sheet or parchment paper to cool. Yield: 12 small candied apples.

You might also enjoy these recipes:
Caramel Corn - Chasing Delicious
Making Candy in the Spirit of Halloween - The Food Addicts
Mummy Munch - Picky Palate
Caramel Apples - Annie Eats
Candy Compost Bars - Sugar Plum
Cakespy: Homemade Candy Corn - Serious Eats

This post is being linked to:
Pink Saturday, sponsored by Beverly at How Sweet the Sound.

Namaste Jig

There is so much to tell you and very little time in which to do it. We are into the 6th day of our trip and have toured New and Old Delhi. With the help of a translator I was able to spend a full afternoon in the street markets of Old Delhi and can't tell you how much I enjoyed it. The sites and sounds and smells of the old city are intoxicating and an experience I'll never forget. We had two lectures while in Delhi. One was about the comparative religions of India and the other about the life and philosophy of Ghandi. We have been dinner guests in two Indian homes and I've completed a cooking lesson in the breads of India. We are heading to Agra. I hope to report more from there. I hope you are all well. Blessings...Mary

DREAMS DO COME TRUE

I AM SO EXCITED TO ANNOUNCE THAT WE ARE OPENING FOR WEEZER IN LOS ANGELES ON NOVEMBER 26TH AND 27TH AS PART OF THEIR "MEMORIES" TOUR AKA: PINKERTON/BLUE ALBUM/GREATEST HITS TOUR AT THE GIBSON AMPHITHEATRE. I AM BEYOND EXCITED!!!!!!!!!


NPR WORLD CAFE

CHECK OUT THIS SESSION WE DID FOR NPR WORLD CAFE ON OUR LAST TOUR CLICK HERE TO LISTEN TO THE INTERVIEW/SONGS!

Soft and Chewy Peanut Butter Cookies


From the kitchen of One Perfect Bite...While I carry no lantern, my quest for the world's best peanut butter cookie has kept me searching with a determination that rivals that of the old cynic who went looking for an honest man. I have a taste memory, and while I've been looking for years, I've yet to duplicate it. Mine is not a loving or romantic tale. The cookie I remember was served in the cafeteria of a school I attended as a child. It had an intense peanut flavor and was so dense and crisp that it held its shape when dunked into a glass of milk. This year, I thought I'd use a different approach and decided to try a soft and chewy cookie that received rave reviews at allrecipes.com. I made a few minor changes to the recipe I found there. I added a cup of coarsely chopped salted peanuts to the ingredient list and replaced the mix of light and dark sugars with my current favorite, golden brown. Before I go any further, I must tell you that these cookies are delicious. I must also tell you I'm still looking for the cookie that will put my memories to rest. I encountered one issue as I made these that I want to share with you. I had to chill the cookie dough before it could be rolled into balls. This may have to do with the way in which flour is measured. I fluff and scoop and may have used less flour than someone using a different technique. At any rate, the dough was workable after being chilled and made exactly 3 dozen cookies. If you like your peanut butter cookies on the soft and chewy side, give this recipe a try. You won't regret it. Here's the recipe.

Soft and Chewy Peanut Butter Cookies...from the kitchen of One Perfect Bite adapted from allrecipes.com

Ingredients:
1 cup peanut butter
1/2 cup butter, softened
1 cup golden brown sugar
1 egg
3 tablespoons milk
1 teaspoon vanilla extract
1-1/4 cups all-purpose flour
3/4 teaspoon baking powder
1/4 teaspoon salt
1 cup coarsely chopped salted peanuts

Directions:
1) Preheat oven to 375 degrees F.
2) In a large bowl, cream together peanut butter, butter, and golden brown sugar until well blended. Beat in egg, milk, and vanilla one at a time. Combine flour, baking powder, and salt; stir into creamed mixture. Fold chopped nuts into dough. Chill dough if necessary to roll. Roll tablespoonfuls of dough into balls. Place cookies 2 inches apart onto ungreased cookie sheets. Press each ball once with fork tines.
3) Bake for 8 to 10 minutes in the preheated oven, or until edges are lightly browned. Let sit for 2 minutes on cookie sheet. Remove and cool on wire racks. Yield: 36 cookies.

Your might also enjoy these recipes:
Top Chef Worthy Peanut Butter Cookies - Cookie Madness
Tuesday's with Dorie: Peanut Butter Crisscrosses - A Whisk and A Spoon
Honey Peanut Butter Cookies - Baking Bites
Big, Super Nutty Peanut Butter Cookies - The Culinary Chronicles
Flourless Peanut Butter Cookies - Within the Kitchen
Gluten Free Peanut Butter Cookies - The Baking Beauties
Over the Top Reese's Peanut Butter Cookies - Real Mom Kitchen
Peanut Butter Cookies with Ketchup - Cookie Madness
Oatmeal Peanut Butter Cookies - Gonna Want Seconds
Peanut Butter Chocolate Kiss Cookies - The Comfort of Cooking

Inside Outside Ravioli - Pasta Nudi


From the kitchen of One Perfect Bite...The Italians call it pasta nudi, or naked ravioli. It's much easier to make than classic forms of the dish and some like it just as well. The ingredients are identical to those used to make a meat-filled ravioli, but the pillows are deconstructed and the filling appears outside, rather than inside, the pasta. If you are pressed for time, and most of us are these days, this dish will deliver the characteristic flavors of ravioli without the work associated with its construction. What is lost, however, is the lovely texture of the stuffed pasta. This recipe was developed by Mark Bittman for The New York Times. He uses a sage-infused brown butter to dress the pasta. While some members of my family love this dish, it is too rich for my palate and I eat only small quantities of pasta when it's prepared in this fashion. Since mine is a minority opinion, I've decided to post the recipe and let you judge for yourself. The meatballs, which are poached in water, can be made well ahead of time, so there is minimal last minute fuss required to bring this dish to the table. If you like meatballs and brown butter sauce, I suspect this dish will become a favorite of yours. Here's how it's made.

Inside Outside Ravioli - Pasta Nudi

Ingredients:
1/2 pound ground veal
1/2 pound ground pork
1 large egg
1/4 cup grated Parmesan cheese, more for garnish
1/4 cup chopped fresh parsley leaves
1/4 cup very finely minced onion
Salt and pepper to taste
1 pound fresh or dried pasta, any kind
1/4 cup (4 tablespoons) butter
20 fresh sage leaves

Directions:

1) Place meat, egg, cheese, parsley, onion, and salt and pepper in a medium bowl. Mix well but do not knead. Form into balls 1/2-inch in diameter. Refrigerate until ready to cook. Bring a large pot of water to a boil and salt it.
2) Cook meatballs in water for about 5 minutes; remove with a slotted spoon and keep warm. Cook pasta in same water until tender but not mushy.
3) Meanwhile, in a medium pot cook butter and sage together until butter is light brown, about 5 minutes.
4) Before draining pasta, reserve a bit of its cooking water. Drain pasta, then toss it with butter-sage mixture and enough reserved water to make it saucy. Top with meatballs and serve, passing grated Parmesan at the table. Yield: 4 to 6 servings.

You might also enjoy these recipes:
Butternut Squash Ravioli - Vegacious
Basil and Goat Cheese Ravioli - The Saucy Kitchen
Arugula and Goat Cheese Ravioli - The Red Spoon
Corn and Pesto Ravioli with Parmesan Butter Sauce - Inexpensive Eating
Ravioli Gnudi with Walnut Sauce - Cinnamon Spice and Everything Nice
Red Pepper, Garlic and Herb Ravioli - Barbara Bakes
Asparagus, Pancetta and Ricotta Ravioli - Ladyberd's Kitchen

seriously the most amazing

Blue Cheese Dip


From the kitchen of One Perfect Bite...This is one of the chameleons of my kitchen. I use it as a dip, a spread and a salad dressing. It main ingredient is cottage cheese and that makes it figure friendly, as well as being versatile and easy to do. The downside to this recipe, if there is one, is that you'll need a food processor to break up and pulverize the cheese curds. Plan to make this a day before you plan to use it and use a really good blue cheese for best flavor. The original recipe was developed by Patricia Wells and she used a French Roquefort to make the dip. French Roquefort is made from sheep's milk and is naturally aged in caves to produce the blue streaks with which we are all familiar. The cheese must ripen for a period that ranges from three months to a year in order to produce its characteristic aroma and flavor. Other blue veined cheeses, domestic or imported, are made from cow's milk and are aged in humidity controlled environments rather than caves. I use Roquefort during the holiday season, but rely on good domestic varieties for the remainder of the year. The dip can be thinned with milk to produce a wonderful salad dressing. If you enjoy blue cheese I think you'll enjoy this dip. Here's the recipe.

Blue Cheese Dip...from the kitchen of One Perfect Bite, inspired by Patricia Wells

Ingredients:
2 cups cottage cheese
1/4 cup fresh snipped chives
1/2 to 3/4 cup coarsely crumbled Roquefort or blue cheese
Salt and pepper to taste

Directions:

Place cottage cheese in bowl of a food processor; pulse to break up curds. Add chives and blue cheese and process briefly just to blend. Season with salt and pepper to taste. Pulse again to distribute seasonings. Transfer to a lidded container and store in refrigerator for at least 24 hours to ripen. Bring to room temperature to serve. Yield: 2 cups.

You might also enjoy these recipes:
Bleu Cheese and Bacon Dip - Easy Appetizers
Roasted Red Pepper Hummus - Eat Real
Hummus - Food for Thought
Easy Appetizer: White Bean Dip - Spoonful
Baba Ganoush - One Perfect Bite
Seven Layer Bean Dip - Simply Recipes
Easy Black Bean Dip - Pinch My Salt

WARPAINT

Top Tip #7 - Anything Goes!!


Morning all!

Hope you are all having a nice week.  Now on for a two week challenge as we are having a bit of a re-jig.  

Yep, thats right, this week over here at Top Tip Tuesday, we are not giving you a tip but holding an 

ANYTHING GOES CHALLENGE!!

Create anything, add it to Inklinkz below, and be in with a chance to win one of the following 4 prizes:
-------------------
Prize 1
Daisys Digi Doodles is offering one lucky winner a $10 Gift Certicate!

Hiya, my name is Julie, I'm also known as Jules, Jue, MIss DAisy, Hey you...depending on who I am speaking to, LOL!  I have been married to the love of my life for 21 years, we have 1 son and a cat.  I have drawn off and on since I was small, my mum was always doing craft related things, I must take after her.  I have been making digi's for just under a year now, and I love it!  I have tried loads of crafts, modelling (not that sort...I wish :o)), cross stitich embroidery, painting, glass painting...etc.  I have dabbled with cards, but the whole house became my craft room so I stick with the computer now, so much tidier!  I leave the cards to the experts now, LOL!  It gives me so much pleasure to see the cards made using my images.  I am always awestruck by how much talent there is out there.  I also love reading and watching footie :o)

-------------------

Prize 2
Prize - £10 Gift Voucher
Joanna has been involved in the craft world since 1979.  She had written over 30 books on cookery, herbs, stencilling, crafts and flowers during the past 20 years and is now best known for her work on TV with her craft CDs, cardmaking and rubber stamp programmes.
-------------------
Featured Card - Prize 3

Squiggle Stamps are offering a lucky winner a GBP 15 gift voucher!
Squiggle Stamps carry a unique range of cute, quirky and whimsical stamps designed by a talented team of illustrators.  Our images are available as both Rubber and Digital Stamps.  We have a fabulous Design Team who offer creative ideas and inspiration every day on the blog and also run monthly prize challenges With new images arriving all the time we are delighted to offer many new designs for your creations.
-------------------
Featured Card - Prize 4


Sunshine & Giggles is offering our lucky Featured Tipper 3 digi images of their choice!!

My name is Janice Hopper, owner of Sunshine and Giggles Stamps.  I started Sunshine & Giggles one year ago offering images of kids just being kids, from all walks of life.  We are now expanding the line to offer cute little animals as well.  All images are delivered directly into your in box in ZIP JPEG format. No wait time!  The beauty of digital is you can resize to your liking.  This weeks winner will get to select 3 images of their choosing.
-------------------

Wowzers, 4 fabulous prizes!!  Now onto some inspiration from the DT who were given some gorgeous images from Squiggle Stamps to work with:


Aren't they georgeous?! Make sure you stop by their blogs to look at their creations!!
-------------------

So then, all you have to do for the next week to be in for winning one of the 4 fabulous prizes is simply create anything, and link to Inlinkz!  Two prizes will be chosen by Random.org and the two Featured Card prizes will be chosen by the TTT Team!

This challenge closes at 10pm UK Time on Monday 1st November.

No more than 3 entries per person, each entry has to be a new, different creation and be linked back to Top Tip Tuesday.  Back linking posts will be deleted.

We can't wait to see all your wonderful creations!!!


Winner of Top Tip #6 & Featured Winner


Hello everyone!

Hope you are all having a nice week!  Thank you all that entered our competition, again, we have fun looking at all the fabulous tips that you come up with, they are amazing.


The winner of the Softpencil $10 voucher is:

Congratulations Nicky!


Our featured tipper this week who will win 5 images (not VIP) Sew Many Cards
is: Linda B!!


Congratulations ladies -
Please can you ladies take your badges, and e-mail me at toptiptuesday@gmail.com so that I can get your prize sorted out for you!!   Please note, that if I don't receive an email from you by 9pm on Friday then I reserve the right to redraw another winner.

Hope to see you at 8.30 for a fanastic CHALLENGE!!

THANX RANDY

Soupe Au Pistou


From the kitchen of One Perfect Bite...This is, of course, Julia Child's classic version of the simple, but fragrant Provencal vegetable soup. The soup is a summer favorite in the Mediterranean. It's then that herbs and sundry beans come to market and hawkers push their bounty shouting, "Mesdames, faites le bon piste, faites le pistou!" I'm not much for summer soup, so it's fortunate that the vegetables used to make this span the seasons. What sets this soup apart from others of its ilk, is the freshness of its vegetables and the use of pistou, a sauce made with garlic, basil, tomato and cheese. This is one the first recipes I made as I worked my way through the first volume of Julia's Mastering the Art of French Cooking. It is foolproof, and the only thing that can be done to spoil it, is to overcook the vegetables thrown into the pot. If you love peasant food, this soup is one you'll find hard to resist. You'll never forget its unique aroma, and its color, taste and texture will allow your imagination to run wild. With any luck, you'll find yourself sitting at a scrubbed, worn table in a farmhouse kitchen enjoying the bounty of your French host's garden. The fantasy would be perfect if Julia were also there to entertain. Here's her recipe, in case you missed it first time around.

Soupe Au Pistou...from the kitchen of One Perfect Bite, courtesy of Julia Child

Ingredients:

Soup
3 quarts water
2 cups diced waxy potatoes
2 cups diced carrots
2 cups diced onion or white of leek
1 tablespoon salt
2 cups canned white navy or kidney beans, drained
1/3 cup broken spaghetti
1 slice stale white bread, crumbled
2 cups fresh green beans, trimmed and cut into 1-inch lengths
1/4 teaspoon freshly ground black pepper
Optional : pinch of saffron
Pistou
4 cloves crushed garlic
4 tablespoons tomato paste
1/4 cup chopped fresh basil
1/2 cup grated Parmesan cheese
1/4 to 1/2 cup fruity olive oil

Directions:
1) To make soup: Bring water, potatoes, carrots and onions or leeks, and salt to a boil in a 6-quart soup pot. Reduce heat and simmer uncovered for 40 minutes. Adjust salt and pepper to taste. About 20 minutes before serving add white beans, broken spaghetti, bread, pepper and saffron to the soup and simmer for 10 minutes. Add the green beans and simmer 5 to 10 minutes more, until they are cooked through but still crunchy. Again adjust salt and pepper to taste.
2 ) To make pistou: While the soup is simmering, place the garlic, tomato puree or paste, basil and cheese in a soup tureen or another pot. Pound to a paste with a wooden spoon, then beat in olive oil, drop by drop.
3) To finish and serve: Whisk a cup of hot soup into tureen containing pistou. When smooth add rest of soup and stir well to combine. Serve hot with French bread or croutons. Yield: 6 to 8 servings.

You might also like these recipes:
Root Vegetable Soup with Honey and Sage - The English Kitchen
Quick Tortilla Chicken and Vegetable Soup - 101 Cooking for Two
Vegetable Bean Soup - The Bake-Off Flunkie
Vegetable Beef Soup - Never Enough Thyme
Healthy Tomato and Vegetable Soup - Taste
Late Summer Vegetable Soup with Basil Pesto - Food Blogga
Roasted Vegetable Soup - In Danny's Kitchen
Minestrone for All Seasons - Italian Food Forever
Vegetable Soup - Niya's Kitchen

"BOYFRIEND"


music video for "BOYFRIEND" is out today!
directed by TAYLOR COHEN

LATE NITE JAMZ


Apple Oatmeal Bread


From the kitchen of One Perfect Bite...I know he means well, but sometimes the Silver Fox is not helpful. He has a tendency to comment on works in progress and I really didn't need to hear his, "...that'll grow hair on your chest," as I added oatmeal to my bread mix. As a child I was very literal minded. If someone were to say I'm beside myself, you can bet I checked the room. Old habits die hard. Without thinking, I glanced down and managed to give him his laugh of the day. What can I say? While it's more nutritious than many, the bread is not a cure for male pattern baldness. It is very easy to prepare and it can be quickly made with no special equipment. Needless to say, it perfumes the kitchen as it bakes and the lingering aroma of cinnamon and apples will drive the unsuspecting to distraction. It's a really nice bread that can be made with a wooden spoon. While it is heavier than many quick breads, it's a perfect fall treat. The bread stays fresh for days and it makes wonderful toast. I hope you will try it. Here's the recipe.

Apple Oatmeal Bread
...from the kitchen of One Perfect Bite

Ingredients:
1-1/2 cups flour
2 teaspoons baking powder
1/4 teaspoon baking soda
1 teaspoon salt
2 teaspoons ground cinnamon
1/4 teaspoon ground nutmeg
2/3 cup brown sugar
1 cup rolled oats
1-1/2 cups grated apple
1/4 cup raisins
2 large eggs
1/4 cup whole milk
1/4 cup vegetable oil

Directions:
1) Preheat oven to 350 degrees F. Grease and flour an 8-1/2 x 4-1/2 inch loaf pan. Set aside.
2) Combine flour, baking powder, baking soda, salt, cinnamon, nutmeg, brown sugar, and oats in a large bowl. Add apple, raisins, eggs, milk, and oil. Mix until dry ingredients are moistened. Mixture will be stiff.
3) Put mixture into prepared pan and bake for 55 to 60 minutes, or until done. Let sit for 20 minutes. Remove from pan and continue cooling on a wire rack. Yield: 1 loaf (about 12 slices).

You might also enjoy these recipes:
Pumpkin Chocolate Chip Bread - You Made That?
Glazed Apple, Carrot and Walnut Loaf - The English Kitchen
Banana Nut Bread - Brown-Eyed Baker
Cherry Pecan Bread - Amanda's Cookin'
Coconut Bread - Bored Cook in the Kitchen
Cinnamon Quick Bread - Sugar Plum
Raspberry Almond Swirl Bread - Baking Bites