Chicken Gumbo - Filé Gumbo


From the kitchen of One Perfect Bite...I had a small, surprising triumph tonight. Before going any further, I want to extend an apology to any of my Southern friends who might find my victory lap or bow a bit premature. I stepped into their territory, if not their kitchens, and made gumbo tonight. Despite my years in the kitchen, this was a first for me. I love gumbo, but I found the making of roux off-putting. Armed with great directions, which you can find here, I decided to give it a try and I think I did alright. I made minor alterations to a recipe developed by Emeril Lagasse and was really pleased with the results. My only caution is that you need time to make this. It really is not difficult to prepare, but it needs watching and some of its elements take longer to cook than the recipe would have you believe. Most significantly, it took an hour, rather than 20 minutes, for my roux to become the color of chocolate. The trick is to get it to that chocolate color without burning the roux. If it burns you'll have to toss it. Despite that, I highly recommend this gumbo and hope you will try it. Here's the recipe.


Chicken and Smoked Sausage Gumbo with White Rice...from the kitchen of One Perfect Bite, inspired by Emeril Lagasse

Ingredients:
1 tablespoon plus 1/2 cup vegetable oil
1 pound smoked andouille sausage, cut crosswise 1/2-inch thick pieces
4 pounds bone-in chicken thighs, skin removed
1 tablespoon Creole seasoning
1 cup all-purpose flour
2 cups chopped onions
1 cup chopped celery
1 cup chopped bell peppers
1 teaspoon salt
1/4 teaspoon cayenne
3 bay leaves
9 cups low-sodium chicken broth
1/2 cup chopped green onions
2 tablespoons chopped parsley leaves
1 tablespoon filé powder (ground sassafras leaves)- see Cook's Note
.
Cooked white rice
Hot sauce

Directions:
1) Heat 1 tablespoon oil in a large heavy pot set over medium-high heat. Add sausage and cook until brown, about 8 minutes. Remove sausage from pan and drain on paper toweling. Set aside.
2) Season chicken with Creole seasoning. Brown, in batches, using pot in which sausage was cooked. Remove from pan. Let cool and refrigerate until ready to use.
3) Add flour and reserved 1/2 cup oil to pan in which chicken and sausage browned. Cook, stirring slowly, for 20 to 25 minutes to make a chocolate colored roux. I had to cook mine for an hour to achieve this color.
4) Add onions, celery, and bell peppers and cook, stirring, until wilted, 4 to 5 minutes. Add reserved sausage, salt, cayenne, and bay leaves, stir, and cook for 2 minutes. Stirring, slowly, add chicken stock, and cook, stirring, until well combined. Bring mixture to a boil. Reduce heat to medium-low and cook, uncovered and stirring occasionally, for 1 hour.
5) Add reserved chicken to the pot and simmer for 1 1/2 hours, skimming off any fat that rises to surface.
6) Remove pot from the heat. Using a slotted spoon, remove chicken thighs from the gumbo and place on a cutting board to cool slightly. Remove and discard bay leaves. Pull chicken meat from bones and shred, discarding bones. Return meat to gumbo and stir in the green onions, parsley, and filé powder.
7) Spoon rice into bottom of deep bowls or large cups and ladle gumbo on top. Serve with hot sauce if desired. Yield: 6 to 8 servings.

Cook's Note: File powder has a very earthy flavor that tastes like a combination of thyme and savory. It can be found in the spice aisle of large food chains. The powder comes from grinding dried sassafras leaves. If you would like to make your own filé powder, instructions can be found here. Filé powder is added at the end of cooking to thicken the gumbo. To add it sooner can cause the gumbo to become stringy. It can also be passed and added at the table.

You might also enjoy these recipes:
Shrimp and Sausage Gumbo - The Bake-Off Flunkie
Chicken Gumbo - Louanne's Kitchen
Quick and Easy Sausage and Okra Gumbo - Sing for Your Supper
Shrimp and Okra Gumbo - Felice in the Kitchen
Pancetta and Shrimp Gumbo - Chow and Chatter
Cajun Gumbo Soup - The Teacher Cooks

Clam Chowder


From the kichen of One Perfect Bite...In a perfect world garlic would be peeled and minced as needed, chicken stock would bubble gently on the stove, and kitchen shortcuts would be unheard of. I've been blessed with a near perfect life but it's spent in an imperfect world, so shortcuts abound in my kitchen. I not proud of them, mind you, but they are a real part of my life and there are nights that dinner would never make it to the table without them. I share them when I think they might be helpful, but for the most part they are my secrets and I reveal them in the same way you peel an onion, a layer at a time. Having said that, I suspect it won't surprise you to learn that I smile when the pros talk about shucking oysters or picking crab. I think it's important to know how to do those things, but, in the great scheme of things, I don't think it's necessary to actually do them. My bad attitude extends to clams as well. For years, I refused to make chowders with anything other than fresh clams and I'd pay premium prices to have them opened and chopped. My fishmonger loved to see me and my wallet coming. I still prefer to use fresh clams, but several years ago the warehouse stores started carrying restaurant-size cans of chopped clams and I have had them in my pantry ever since. They really are an acceptable alternative to fresh clams in dips, spreads, fritters and chowders. One of the problems that empty nesters encounter is the quantity of food that is produced when standard recipes are followed. Chowder is no exception. Several years ago Cook's Illustrated developed a chowder that used canned clams and was scaled to feed two people. It's a treasure of a recipe and if you enjoy chowder I hope you'll give it a try. A careful reading of the recipe will show it can easily be scaled up or down. I've made it for eight and I've made it for one. It works every time. There are a few things I want to share with you. I use 1/3 cup of drained, chopped clams for each can the recipe calls for. I use 1/4 cup finely chopped onion for each person I'll be feeding. One of the current oddities in recipe development is the push to list ingredients for some by weight rather than measure, while still calling for ballpark-general measures like half an onion or juice of a lime in others. What size onion? What size lime? I digress. This is a really nice recipe and those of you who try it will love it. The chowder is best made with heavy cream but it is workable with light cream or half-and-half. Here's the recipe.

Clam Chowder for Two
...from the kitchen of One Perfect Bite, courtesy of Cook's Illustrated

Ingredients:

2 (6.5-ounce) cans minced clams
1 (8-ounce) bottle clam juice
Water , if necessary
2 slices thick-cut bacon (about 2 ounces), cut into 1/4-inch pieces
1/2 onion , chopped fine
1 clove minced garlic
1 tablespoon unbleached all-purpose flour
2 large red potatoes (about 3/4 pound), scrubbed and cut into 1/2-inch pieces
1 large bay leaf
1/2 teaspoon fresh thyme or 1/4 teaspoon dried thyme
1/2 - 3/4 cup heavy cream
1 tablespoon minced fresh parsley leaves

Instructions:
1) Drain clams, reserving juices. Add bottled clam juice to reserved clam juice to measure 2-1/2 cups (if short, add enough water to make up difference).
2) Cook bacon in a medium, heavy-bottomed saucepan over medium-high heat until beginning to crisp, about 5 minutes. Stir in onion and cook until onion has softened and bacon is crisp, about 5 minutes.
3) Stir in garlic and cook until fragrant, about 30 seconds. Stir in flour and coat vegetables, about 1 minute. Gradually whisk in clam broth. Stir in potatoes, bay leaf, and thyme. Bring to a simmer and cook until potatoes are tender, about 15 to 20 minutes.
4) Stir in clams, cream, and parsley. Return to a simmer briefly, then remove from heat. Discard bay leaf, and season with salt and pepper to taste. Yield: 2 servings.

You might also enjoy these recipes:
Ginger and Clam Soup - RasaMalaysia
Linguine and Clams and Garlic White Wine Sauce - The Red Spoon
Cuban Clam Fritters with Cilantro Mayonnaise - Lazaro Cooks
Steamed Clams in a Beer, Lemon and Garlic Sauce - Boston Whine and Dine
Spicy Asian-Style Noodles with Clams - Very Culinary
Clams and Mussels in Tomato Broth - Magiandobene

Zucchini Muffins


From the kitchen of One Perfect Bite...If you are into muffins, I have a treat for you. These muffins come from The Shipyard Galley, a restaurant, on Buzzard's Bay in Massachusetts. I have no adventure or quaint characters to share with you today. As a matter of fact, I've never set foot on Buzzard's Bay, much less eaten at The Shipyard Galley, but thanks to the folks at King Arthur Flour I do have the recipe for their wonderful zucchini muffins. This was a case of love at first bite and I must tell you I'm hooked. Whenever I make these, I have to fight the urge to use large muffin pans and only the calorie count prevents me from doing so. A standard muffin checks in at 335 calories, doubling that means more time on a treadmill than I'm willing to spend. More's the pity! If you try these, I suspect you'll share my addiction. Here's the recipe.

Zucchini Muffins...from the kitchen of One perfect Bite, inspired by The Shipyard Galley an King Arthur Flour

Ingredients:
1 cup granulated sugar
1/2 cup vegetable oil
2 large eggs
1/2 teaspoon vanilla extract
1/2 teaspoon baking powder
1/2 teaspoon baking soda
1/2 teaspoon salt
1/2 teaspoon ground cinnamon
1-1/2 cups all-purpose flour
1 cup grated zucchini
1/2 cup chopped toasted walnuts
1/2 cup raisins or currants

Directions:
1) Preheat the oven to 375 degrees F. Line one 12-cup muffin tin with papers, or grease each cup.
2) Beat sugar, oil, eggs, and vanilla till smooth and somewhat lightened in color, about 1 minute at high speed.
3) Add baking powder, baking soda, salt, and cinnamon, beating to combine.
4) Add flour, beating just till smooth.
5) Add the zucchini, nuts, and raisins or currants.
6) Divide batter evenly among the prepared muffin cups, filling them about 3/4 full.
7) Bake muffins for 25 to 27 minutes, or until a cake tester inserted into a muffin comes out clean. Remove from oven, and after a minute or so gently tilt them in pans, so their bottoms don't become soggy. As soon as muffins can be handled, transfer them to a rack to cool. Yield: 12 muffins.

You might also enjoy these recipes:
Zucchini Blueberry Bread - Mrs. Regueiro's Kitchen
Zucchini Carrot Muffins - Real Mom Kitchen
Double Chocolate Zucchini Bread - All Day I Dream About Food
Whole Wheat Zucchini Muffins with Greek Yogurt - Andrea Meyers
Zucchini and Cranberry Chocolate Chip Cookies - Sweet and Savory Tooth
Lemon Zucchini Cookies - Mindika Moments

WHATS IN MY BAG

Top Tip Tuesday Tip No. 4 - Recycling!


Hi Tuesday Top Tippers,
Carol here and it’s my turn to share a Top Tip with you!

Haven’t the tips so far been fab! Firstly Leanne’s Doily Flower (which you’ll see again a bit lower in this post!) and then Moriah’s altered clipboard and wasn’t Maggie's Grunge Paper Flower last week gorgeous!


This week is going to be slightly different, my tip is all about recycling so I’m going to show you a few ideas for using everyday rubbish on your cards or projects............from sawdust to hard backed A4 used envelopes!!!

Don’t forget if you have a top tip this week add it to your blog and then to Mr Linky below and you could be one of our winners.
I’d especially love to see your recycling tips – a before and after photo on your blog would be fantastic.

We have some more fantastic sponsors for this weeks random chosen prizes and also for my chosen ‘Top Tip’.
Please get your tips linked early so I have plenty of time to pass my featured tip winner to Leanne.


--------------------------------------

Winner 1 - Squigglefly.com
Prize - 2 Digi Images

Squigglefly.com is a digital stamp company, offering over 2,000 unique digis in a wide range of styles from over 20 different artisits.


Prize 2 - The Crafty Pad
Prize: 2 Digi Images

Debbie at The Crafty Pad Stamp Designs said:
The Crafty Pad Stamp Designs is proud to sponsor Top Tip Tuesday.  I own and run The Crafty Pad Stamp Designs.  We offer a variety of both polymer stamps and digi stamps.  Weekly challenges are held at The Crafty Pad Blog.


Featured Tipper Prize - Joanna Sheen
Prize - £10 Gift Voucher


Joanna has been involved in the craft world since 1979.  She had written over 30 books on cookery, herbs, stencilling, crafts and flowers during the past 20 years and is now best known for her work on TV with her craft CDs, cardmaking and rubber stamp programmes.


--------------------------------------

Carol’s Rubbish Tip!


A4 Hard Backed Envelope

…the ‘anti-bend’ type…
After taking off all of the surrounding paper you have a perfect piece of ‘Kraft’ type card to use as a backing piece.


Corrugated Card
…any cardboard box type…
The corrugated card will have one face that will peel off – gently peel this away to reveal the corrugated pieces. Leaving bits attached will add to the rustic look.

Wooden Coffee Stirrers

&
Large BBQ Kebab Skewers
…from well known coffee shop chains…and Supermarkets
I have found loads of uses for the coffee stirrers from making frames on cards to using them as the ‘stays’ in my Arty Farty Cribs!

And on this crib I also used a Kebab Skewer through the straw to give strength to the bead bar.


Broken Jewellery

…earings, necklaces, braclets…
These are fab to take apart and use as charms or embellishments – It’s not unusual for me to buy cheap jewellery to actually take apart.
After spending some time taking apart and cleaning you’ll be amazed at how many separate pieces you have to use!

I've added a piece of ribbon to one piece to make it into a buckle!

Packaging

Some packaging used for everyday essentials is perfect for recycling. Here I’ve used a piece of gloss black card from sticky fixers! Use chocolate boxes, coffee boxes anything really – even the dreaded Junk Mail we get may have a fab pattern or block of colour you can punch a few flowers out of!

AND
Film Reel
This is a good one! If you are anything like me you have loads of now redundant film reels in your ‘camera cupboard’. My daughter came across 12 last week whilst looking at old photos – which was when this idea came to me!!! Pull a section of the film from the reel and using a square punch take out little ‘picture’ sections. You could add small pictures or letters like I have here – I backed the film section with mirri board first then used rub-on letters in the spaces.


Can you work out how many recycled bits I've used on this card? I've used the fab image 'Hangin  with Friends' from one of our fab sponsors this week...Sunshine & Giggles.


Here are some pictures of items I’ve made in the past with recycled bits – but not taken the ‘before’ pictures.

Large Match Box

If you use a new pack these make lovely gifts for the mantelpiece of those lucky enough to have a real open fire.
Or cover used ones as a sweet little drawer.

Hot Drink Sachet Box

Cover and then re-fill!


Chocolate Box


Wrapping Paper


Sawdust
PVA then sprinkled with sawdust for the frame.


Think I’d better stop now or this post will be way too long!


I think you get the idea – now it’s YOUR turn!

Link your tip to Mr Linky below and you could be winning one of the prizes from our fab sponsors.
Happy Recycling!

--------------------------------------

All you need to do to be in with a chance of winning one of our fabulous prizes is:


Share a tip
then leave the direct link to your tip/creation on the inlinkz below. Remember the rules...

  1. Create a new blog post on your blog with your Top Tip
  2. Put a direct link to that post using InLinkz below
  3. Make sure there is a link on your post to www.toptiptuesday.blogspot.com
Please, do not use old posts. Only new posts will be eligible to win the prize. Any old dated posts will be removed.
I hope you like my tutorial and I can't wait to see your fantastic tips.  Remember, if you use my tutorial, please email us at toptiptuesday@blogspot.com so we can see!


Tip #3 Winner & Featured Tipper


Good morning!

Thank you so much to everyone who took part in our Tip last week - it was great going to see your fabulous ideas!


Winner 1 of the Digital Delights $10 voucher is:


Congratulations Vee!!
Please e-mail us at toptiptuesday@gmail.com so that I can sort out your prize and send you your winners badge to put on your blog!!

Winner 2 of the Daisys Digi Doodles Pumpkin Image is


Congratulations Mrs Tiggy Winkles!!
Please e-mail us at toptiptuesday@gmail.com so that I can sort out your prize and send you your winners badge to put on your blog!!


Our featured tipper this week who will win 3 digi images from  Sunshine & Giggles
 is , 
 

Sally showed us how to use thin pieces of cardstock through buttons to match your project - fabulous idea!  Go over and check out her blog 

Please e-mail me at toptiptuesday@gmail.com so I can sort out your prize and send you your featured badge to put on your blog!

Please can you ladies take your badges, and e-mail me at toptiptuesday@gmail.com so that I can get your prize sorted out for you!!   Please note, that if I don't receive an email from you by 9pm on Friday then I reserve the right to redraw another winner.

Hope to see you at 8.30 for another FANTATSIC tip!


Mushroom Galette


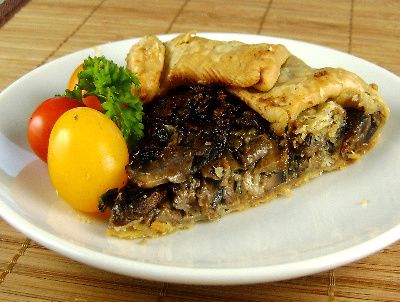
From the kitchen of One Perfect Bite...It's been a busy day. I've started working on the dishes that I'll be featuring while we are traveling and the first day of cooking is always daunting. I managed to get a lot done, but as the sun set I had a "Eureka" moment. Surrounded by plates of food, I had forgotten about dinner and nothing on my counters was suitable for an evening meal. I grabbed a pie crust from the freezer and mushrooms and cheese from the refrigerator and threw together this homely galette. It normally is a much grander affair. On a good day, wild mushrooms, sauteed with fresh herbs and shallots, are tossed with a premium blue cheese and wrapped in a cloak of puff pastry that's baked until the color defines rich golden brown. That didn't happen tonight. I took every shortcut imaginable, but there is an upside to this sad tale. It worked. If I hadn't had the good stuff, I never would have known that this wasn't the real thing. The recipe I pillaged belongs Joanne Weir who is one of my favorite foodies. She stays under the radar but her recipes are spot on and I love her style. I'm going to share her recipe for Warm Stilton and Mushroom Galette with you and let you guess where I took my shortcuts. Here's her recipe.

Mushroom Galette...from the kitchen of One Perfect Bite, courtesy of Joanne Weir

Ingredients:
Crust:
1-1/4 cups all-purpose flour, frozen in the freezer 1 hour
1/4 teaspoon salt
8 tablespoons ice cold butter, cut into 12 pieces
4 tablespoons sour cream
2 teaspoons lemon juice
1/2 cup ice water
Filling:
1/4 ounce dry porcini mushrooms
1 cup boiling water
2 tablespoons unsalted butter
6 green onions, white and green, thinly sliced
1/2 teaspoon freshly chopped rosemary
1/2 teaspoon freshly chopped thyme
1 pound cultivated or button mushrooms, thinly sliced
4 ounces Stilton or other blue-veined cheese

Directions:
1) To make crust: Place flour and salt in a food processor and pulse two times to combine. Add butter and pulse several times until most of the mixture is size of bread crumbs with a few pieces remaining pea sized. Dump mixture out onto a work surface in a pile. Spread it out a little. Make a well in center of mixture. Whisk together sour cream, lemon juice and water; add half of liquid to well. With your fingertips, mix liquid with dry mixture until large lumps hold together. Remove large lumps and repeat with remaining liquid, using as much liquid as needed to hold dough together. Refrigerate for 1 hour.
2) Preheat oven to 400 degrees F. Place dry porcini mushrooms in a small bowl, cover with boiling water and let sit 30 minutes. Drain mushrooms and reserve liquid for another use. Finely mince mushrooms and reserve.
3) In a large frying pan over medium heat, melt butter. Add green onions and cook, stirring occasionally, until soft, 5 minutes. Add rosemary and thyme and continue to cook 1 minute. Increase heat to high, add fresh and minced dried mushrooms and cook until mushrooms are soft and liquid from mushrooms has completely evaporated, 8 to 10 minutes. Remove from the pan and cool.
4) Roll dough on a floured surface to make a 12-inch circle. Place on a baking sheet. In a bowl, combine Stilton and mushrooms. Spread mixture over dough, leaving a 1-1/2-inch border around edges. Fold uncovered edge of pastry over mushrooms and cheese, pleating it to make it fit. There will be an opening in center of tart. Bake until golden brown, 30 to 40 minutes. Cool for 5 minutes. Slide galette onto a serving plate. Serve hot, warm or room temperature.
Yield: 6 first course servings.

You might also enjoy these recipes:
Roasted Vegetable Galettes - The Baking Barrister
Ham and Cheese Galettes - Chow and Chatter
Savory Galettes - A Yankee in a Southern Kitchen
Savory Goat Cheese Parmesan Galette - Use Real Butter
Cabbage and Mushroom Galette - Lisa is Cooking
Zucchini Galette - A Good Appetite

WE HEART U BACK

Kinpira Gobo - Japanese Burdock


From the kitchen of One Perfect Bite...I stumbled on burdock quite by accident. While looking for celeriac in the produce section of my market, I found a stash of dirt encrusted roots that were about 18 inches long. I was intrigued enough to do some research, and learned that what had aroused my curiosity was actually the edible taproot of a plant belonging to the thistle family. While I had never seen it before, the root, called burdock, is popular throughout Asia, where it is still eaten and also used for medicinal purposes. Armed with that basic information, I went ahead and did an extensive search for ways in which to cook it. Strangely, there were few to be found and I found myself dealing with multiple occurrences of the same recipe. I really wanted to try this, but I wanted to get it right first time at bat. The roots were $9 a pound and that didn't leave much room for experimentation. A larger concern was how few of the roots the store actually had in stock. I went back and bought a pound which effectively delpleated their supply. Once home, I decided to use the recipe supplied by a group of expats living in Japan. They have a wonderful site called Tokyo Work Life where, among other things, they maintain a collection of Japanese recipes which you can find here. Their recipe differed from the others in that they used a hot dried chili, rather than miso, to flavor the dish that is called kinpira gobo. Their version of gobo is also cooked in dark sesame oil, rather than being sprinkled with sesame seeds before serving. The first task was to clean and peel the roots. A good scrub with a vegetable brush took care of the encrusted dirt and I used the dull edge of a knife to peel the burdock. A peeler would have removed too much of the flesh. I did cheat a bit with the next step. The recipe called for cutting the roots into a very thin julienne. I used a julienne peeler to do this, so I ended up with lovely, but long, strips of burdock that would be difficult to eat with chopsticks. In a perfect world, the strips would have been cut to a uniform julienne about 2 inches long and 1/16 of an inch wide. I quickly learned that the strips need to go into cold water once they're cut to prevent them from turning black. Soaking in water helps to remove the minerals that cause oxidation to occur. I let mine sit for about 30 minutes in several changes of water. Burdock has a deep earthy flavor, like that of wild mushrooms, but it has a very fibrous texture that can be stringy if you don't cook it correctly or long enough. "Kinpira" describes a dish that is both sauteed and braised. The dual process produces a vegetable that is slightly fibrous and crunchy rather than tough. In Japan this is served as an accompaniment to a main course and rice. It is surprisingly pleasant. If you like to experiment and are in the market for something different, be fearless and give this a try. Here's the recipe.

Kinpira Gobo...from the kitchen of One Perfect Bite, inspired by Tokyo Work Life

Ingredients:
1 pound burdock root, peeled and julienned
1 large carrot, peeled and julienned
1/8 teaspoon red pepper flakes
1 tablespoon dark sesame oil
1-1/2 tablespoons tamari or soy sauce
1-1/2 tablespoons mirin( rice wine)
Vegetable oil
Salt and pepper

Directions:

1) Peel and julienne burdock and carrot into 2-inch matchsticks. Soak in several changes of water for 30 minutes to remove excess minerals that would could cause oxidation. Drain well.
2) Heat pan or wok until hot. Add sesame oil, 1 tablespoon vegetable oil and pepper flakes to pan. Add drained burdock and carrots to pan and saute/stir-fry for about 6 minutes stirring constantly. Add tamari, mirin and 3 tablespoons water to pan. Toss. Lower heat and cook, covered, for 5 to 10 minutes longer depending on how crunchy you like your vegetables. Serve warm with rice: Yield: 4 servings.

You might also like these recipes:
Kinpira Gobo - No Recipes
Cooking with Gobo - Edible Earthscapes
How to Make Kinpira Gobo - Eating Japan
Kinpira - Umami: What's for Dinner?
Kinpira Gobo - mmm-yoso!!!

This recipe is being linked to Regional Recipes - Japan, sponsored by Joanne of Eats Well with Others

Sweet Pickles - Blue Monday


From the kitchen of One Perfect Bite...I've done a lot of experimenting with pickles this summer and was really happy with the outcome. I did, however, have one last recipe to try before the season ended, so I was delighted delighted to find that Kirby cucumbers were still available at my favorite farm stand. The refrigerator dill pickles I made earlier in the season were terrific. I had a recipe for sweet pickles, developed by Tyler Florence, that I also wanted to try before moving on to pumpkins and squash. Today was the day and I'm really happy to report that his recipe is also a keeper. His pickles are very easy to make , but you should plan on a wait time of 5 hours before they are ready to eat. While you can use garden variety cucumbers to make this pickle, their seeds and a slightly bitter skin that makes them less than ideal for pickling. I prefer to use Kirby or English (hot house) cucumbers whenever possible. Refrigerator pickles have a color and crispness that I find irresistible. I hope you will too. Here's the recipe.

Sweet Pickles...from the kitchen of one Perfect Bite, courtesy of Tyler Florence

Ingredients:
6 Kirby cucumbers or 2 regular cucumbers
1/4 cup kosher salt
1 cup water
1 cup rice vinegar
1/2 cup sugar
1 tablespoon coriander seed
1 tablespoon mustard seed
1 tablespoon whole allspice berries
1 cinnamon stick
3 whole cloves
1 bay leaf

Directions:

1) Wash and dry cucumbers. Using a sharp knife or a mandolin, slice cucumbers thinly and place in a colander. Sprinkle with salt and toss to coat. Place colander over a bowl and allow it to sit, covered, for about 1 hour. Rinse off salt and dry cucumber slices well. Place them into a sterilized quart jar.
2) Place water, vinegar, sugar, coriander seed, mustard seed, allspice berries, cinnamon stick, whole cloves and bay leaf in a small saucepan. Set over medium heat, stirring to dissolve sugar, and bring mixture to a boil. Remove from heat and allow to cool. Pour brine over cucumbers in jar. Cover and refrigerate at least 4 hours, preferably overnight. Will keep, refrigerated, for about 2 weeks. Yield: 1 quart sweet pickles.

You might also enjoy these recipes:
Canned Dill Pickles - Pantry Eats
Smokin' Hot Pickled Okra - Coconut and Lime
Pickled Okra - Never Enough Thyme
Zucchini Pickles - Andrea Meyers
Refrigerator Dill Pickles - One Perfect Bite
Dill and Garlic Freezer Pickles - The Other Side of Fifty
Jalapeno Bread and Butter Pickles - Simply Recipes

This post is being linked to:
Smiling Sally - Blue Monday

Pickled Plums - Pink Saturday


From the kitchen of One Perfect Bite...We won't see local berries for another year, but our farmer's markets still have abundant supplies of peaches, plums and pears. We've had lots of desserts lately, so I'm trying to find more savory ways in which to use the bounty. Bob found some beautiful chops at the pork store today, and while I was puzzling how I wanted to prepare them, I remembered an old recipe from Gourmet magazine. The recipe was for grilled chops that were served with pickled plums. I had a recollection of liking the plums well enough to serve them with all kinds of grilled meat. I have a tendency to love certain recipes to death. I make them so often I tire of them and they end up in the box that serves as my recipe graveyard. I suspected I'd find "my" plum pickle there. While it required some digging, I unearthed the recipe and within an hour had pickled plums to serve with our luscious pork chops. The recipe is very easy to do. If you have a small family, make a half portion of the pickle. Chances are pretty high that children won't touch them, so be forewarned and save yourself some grief. Most adults really like these. They should be served in the same way you would serve a salsa or chutney. If you are looking for something different to brighten your grilled meats, I think you'll really like this pickle. Here's the recipe.

Pickled Plums ...from the kitchen of One Perfect Bite inspired by Gourmet magazine

Ingredients:
2-1/2 pounds assorted plums (about 10)
2 medium red onions
2 cups water
2 cups red-wine vinegar
2-1/4 cups sugar
3 cinnamon sticks
1-1/2 teaspoons whole allspice
1/2 teaspoon whole cloves
1/2 teaspoon salt

Directions:
1) Pit plums and cut into 1/2-inch wedges. Cut onions into 3/4-inch pieces and transfer with plums to a 10-cup (2 1/2-quart) heatproof glass jar with a lid.
2) Place vinegar, water, sugar, cinnamon sticks, allspice,cloves and salt in a large saucepan. Bring to a boil, stirring until sugar is dissolved. Immediately pour over plums and onions.
3) Cool mixture, uncovered. Refrigerate, covered, for at least 6 hours. Pickled plums can be kept, refrigerated, for 1 week. Yield: 12 servings.

You might also enjoy these recipes:
Five Spice Plum Chutney - Vegalicious Recipes
Plum and Cherry Compote - Nami Nami
Pickled Plums and Onions - Pham Fatale
Pepper Pork with Chipotle Plum Sauce - Neo-Homesteading
Kabob Party: Easy Grilled Plums with Rosemary Balsamic Glaze - SippitySup
Beef Up Your Beef: Santa Rosa Plum and Mushroom Sauce - The Baking Barrister

This post is being linked to:
Pink Saturday, sponsored by Beverly at How Sweet the Sound.

White Chocolate Lime Cookies and Other Absurdities


From the kitchen of One Perfect Bite...At the bottom of the hill on which our house is perched, there's a community of townhomes whose name always makes me smile.
I suspect that at some point in my life, my sense of the absurd was overly stimulated and I was left with a heightened appreciation of the ridiculous. I also smile when I see a recipe that calls for white chocolate or I'm served a glass of white sangria. Can sangria or chocolate be white? Sangria, whose name comes from the Spanish word for blood, should be that deep color. White sangria, its counterpart, is colorless, like plasma. We all know that white chocolate, which is nothing more than cocoa butter mixed with milk and sugar, is quite unlike the real thing. They both, however, have benefited from thoughtful naming and good marketing. You'd probably never take a bite of something called cocoa butter cheese cake and would never dream of ordering a glass of you know what. What's in a name? Sometimes quite a lot. I have a handful of recipes that use white chocolate. Most of them combine white chocolate with lime. I love the combination and actively seek it out. I found this recipe for cookies that use both at The Fresh Loaf and at Evil Shenanigans. I've made minor changes to the recipe. After baking the first batch, I doubled the amount of lime juice and zest used to make the cookies. These are really quite nice and I think you'll enjoy them. Here's the recipe.

White Chocolate Lime Cookies...from the kitchen of One Perfect Bite, inspired by Evil Shenanigans

Ingredients:

1 cup unsalted butter, softened
3/4 cup sugar
3/4 cup light brown sugar
2 eggs
1 teaspoon vanilla
Zest of 2 limes
2 teaspoons lime juice
2 1/2 cups all-purpose flour
1 teaspoon baking soda
1/4 teaspoon baking powder
1/4 teaspoon salt
1 (12-oz.) bag white chocolate chips

Directions:
1) Preheat oven to 350 degrees F. Line three cookie sheets with parchment paper.
2) Combine butter and sugar in bowl of an electric stand mixer. Beat until combined but not fluffy. Add eggs, one at a time, beating just to incorporate. Add vanilla, lime juice and zest and mix to combine.
3) Combine flour,baking soda, baking powder and salt in a separate bowl. Whisk to combine and lighten. Mix into creamed mixture just until combined. Fold in white chocolate chips.
4 ) Shape dough into 36 balls. Place them 3-inches apart on cookie sheets. Bake until edges are golden and centers are just set, about 12 to 13 minutes. Let sit in pan for 3 minutes before moving to cooling racks. Yield: 3 dozen cookies.

You might also enjoy these recipes:
Key Lime and White Chocolate Cake Squares - One Perfect Bite
Chunky White Chocolate and Almond Oatmeal Cookies - Gourmeted
Macaron with White Chocolate - My Kitchen Treasures
Sour Cherry, White Chocolate and Almond Scones - The English Kitchen
White Chocolate and Macadamia Nut Blondies - Squirrel Bakes
Caramelized White Chocolate Cake - E L R A
Raspberry White Chocolate Scones - Playing House
Raspberry White Chocolate Cake - Sweet Kat's Kitchen

This post is being linked to the Cookie Exchange at Relatively Unique

Tomato Clafoutis


From the kitchen of One Perfect Bite...You know there's too much on your plate when green tomatoes, meant for relish, turn bright red on the pantry shelf while waiting to be used. While there'll be no chow-chow this year, there is an upside to all of this. Those no longer green tomatoes will give me an opportunity to share an old recipe with you. It was developed by Patricia Wells and while it's called a clafoutis, I honestly think it's texture is more like that of a frittata. I'll leave final judgment to those of you who experiment with the recipe. Whatever you chose to call it, rest assured that it's a nice entree for lunch or a light supper. The dish is far more attractive when it's made with uniformly sized Roma tomatoes. Unfortunately, I had to use those pesky no longer green tomatoes to make mine. This is more time consuming than most custard dishes. The tomatoes must be skinned before they are cored and seeded. They are then cut, salted and left to drain on paper toweling for at least 30 minutes to rid them of moisture. Too much juice can spoil the custard, so don't rush this step. I actually let mine drain for about 1 hour before proceeding with the recipe. Once the tomatoes are done, the remainder of the recipe is child's play. I hope you'll give it a try. Here's how it's made.

Tomato Clafoutis...from the kitchen of One Perfect Bite courtesy of Patricia Wells

Ingredients:
2 pounds Roma tomatoes, peeled, cored, quartered, seeded and juiced
Salt
2 whole eggs + 2 additional egg yolks
1/3 cup heavy cream
1/2 cup grated Parmesan cheese
2 teaspoons fresh thyme

Directions:
1) Preheat oven to 375 degrees F. Grease 10-inch round baking dish. Set aside.
2) Salt tomatoes and drain on several thicknesses of paper toweling for 30 to 60 minutes.
3) Place eggs, cream, half of Parmesan cheese and half of thyme in in a small bowl. Whisk to
combine. Adjust salt and pepper to taste.
4) Layer tomatoes on bottom of baking dish. Pour batter over tomatoes. Sprinkle with remainder of cheese and thyme.
5) Bake until batter is set, about 30 minutes. Serve warm or at room temperature. Yield: 6 to 8 servings.

You might also enjoy these recipes:
Tomato, Zucchini and Goat Cheese Clafoutis - What's for Lunch Honey
Eggplant Clafoutis - Eating Club Vancouver
Rose Murray's Roasted Tomato Clafoutis - More Than Burnt Toast
Bistro Artichoke Clafoutis - Sippity Sup
Romanesco Claufoutis with Soy Ricotta - Vegalicious
David Boulud's Asparagus Clafoutis - La Belle Cuisine

Zucchini Fritters


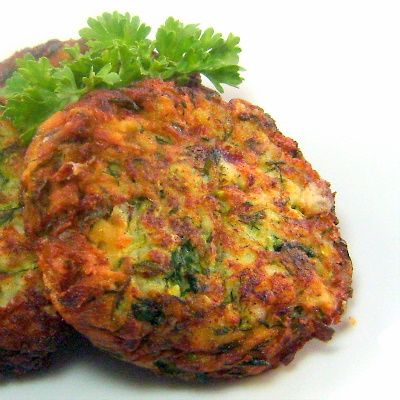
From the kitchen of One Perfect Bite...Zucchini and fruit cake have one thing in common. They both are passed around a lot. Though we don't grow zucchini, generous friends and neighbors keep our cupboards full and we never want for it. While I've lots of recipes for zucchini, I still keep my eyes open for new or different ways in which to prepare it. That's how I happened upon this fritter recipe developed by Michael Symon. Recipes for fritters abound, but his has a Greek flair that makes it especially interesting. The addition of mint and dill and a healthy portion of feta cheese set his fritters apart from others I have tried. You will love these, but if you decide to make them there is a potential problem you should be aware of.

Watery zucchini will spoil the fritters.To avoid that, I use a potato ricer to squeeze as much liquid from them as I possibly can. If the fritter mixture is too damp, the fritters will separate while being fried and leave you with a greasy mess. While these can be made ahead of time and reheated, I don't recommend doing that. My preference is to serve them freshly fried and hot. They can be served with Greek yogurt, or tzatziki if you prefer. They are a bit of work to assemble, but the fritters are delicious and worth the effort. Here's the recipe.


Zucchini Fritters...from the kitchen of One Perfect Bite inspired by Michael Symon

Ingredients:
2 pounds zucchini
1 teaspoon salt
1 tablespoon chopped mint
1-1/2 tablespoon chopped dill
1 large scallion, white and green parts sliced thinly on the bias
2 teaspoons minced garlic
Zest of one lemon
1/4 teaspoon black pepper
1 cup (4-oz.) feta cheese, roughly chopped
1 egg
3 tablespoons flour
Canola oil for frying
Optional:
Tzatziki
Greek yogurt
Fresh dill, to garnish
Additional lemon zest, to garnish

Directions:

1) Grate zucchini onto a clean kitchen towel using the large holes of a box grater. Sprinkle with salt. Set aside for 30 minutes. Wring as much liquid out of the zucchini as possible, discarding liquid. I use a potato ricer for this task.
2) In a medium bowl, combine zucchini, mint, dill, scallion, garlic, lemon zest, pepper and feta. Stir in egg and flour and mix until well combined.
3) Heat enough canola oil in a pan over medium high heat to come halfway up sides of fritters. Form fritters, using 1/4 cup measure, and place gently into hot oil. Fry, turning once, until fritters are golden brown on each side, about 4 to 6 minutes. Remove from pan and drain on paper towels for a minute. Plate and garnish with a dollop of Greek yogurt or tzatziki, fresh dill and lemon zest. Yield: 8 fritters.

You might also enjoy these recipes:
Zucchini Gratin - One Perfect Bite
Stuffed Zucchini Slices - Sugar Crafter
Zucchini Carrot Muffins - Real Mom Kitchen
Zucchini and Carrot Soup - Tobias Cooks
Zucchini-Pineapple Muffins - Kahakai Kitchen
Zucchini Pancakes - Delicious Dishings
Zucchini Bread - Fresh4Five

Top Tip Tuesday Tip #3 - Grundge Flower Tutorial!

Hi everyone! Hope you're having a lovely day :o)

My name is Maggie, and I'm the new member to the team!  I'll show you how to make a beautiful grunge paper flower.

Firstly, we have 3 fabulous sponsors again this week.

Winner 1 Prize:


 Digital Delights are offering one lucky winner a $10 gift certificate.

Welcome to Digital Delights, a magical place filled with digital stamps from all walks of life. We have a wide range of digital stamps which are delivered straight to your email 24/7!! Don't forget about our custom blog design and custom watermarks, all of which are fantastically priced.

Winner 2 Prize


Daisys Digi Doodles is offering one lucky winner this fantastic pumpkin image!


Hiya,
My name is Julie, I'm also known as Jules, Jue, Miss Daisy, Hey you...depending on who I am speaking to, lol.
I have been married to the love of my life for 21 yrs, we have 1 son and a cat.  I have drawn off and on since I was
 small, my mum was always doing craft relate things, I must take after her.  I have been making digi's for just under 
a year now, and I love it.   I have tried loads of crafts, modelling (not that sort....I wish :o), cross stitch, 
embroidery, painting, glass painting...etc.I have dabbled with cards, but the whole house became my craft room, 
so I stick with the computer now, so much tidier!  I leave the cards to the experts now, lol.   It gives me so much 
pleaure to see cards made using my images.  I am always awestruck by how much talent there is out there.  
I also love reading and watching footie :o)


Featured Tipper Prize


Sunshine & Giggles is offering our lucky Featured Tipper 3 digi images of their choice!!

My name is Janice Hopper, owner of Sunshine and Giggles Stamps.  I started Sunshine & Giggles one year ago offering images of kids just being kids, from all walks of life.  We are now expanding the line to offer cute little animals as well.  All images are delivered directly into your in box in ZIP JPEG format. No wait time!  The beauty of digital is you can resize to your liking.  This weeks winner will get to select 3 images of their choosing.

What fantastic prizes!!!  Now on to my tutorial:


What you need:
- grunge paper 15x15cm sheet is enough
- 2 punches
- 4 Promarkers or if you prefer 4 different ink pads. I've chosen browns and a red.
- silicon glue
- pokey tool or something long and thin
- glitter glue
- small square of paper/carboard to use as a base for this flower, approx. 1.5x1.5cm


These are the punches I've used.


You need to punch 15 of those - they'll be coloured in 3 different shades (5 of each shade).

And you need to punch 4 of those - they'll be coloured with the remaining 4th shade.


Colour the petals. 5 with Burnt Orange.

5 with Chestnut.


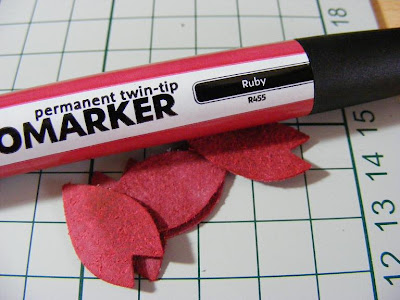
5 with Ruby

Shape 10 of them in two different colours with the pokey tool. (I've chosen 5 in Burnt Orange and 5 in Chestnut)

You should have 10 of these.

Colour these 4 with Cinnamon Promarker.


Together with 5 Ruby petals curl them on the other end of your pokey tool. If you haven't got a pokey tool use a round pencil.


You should have 9 of these.

Put a big portion of silicon glue on the small square of paper you have.

Insert 5 Burnt Orange petals like this.

5 Chestnut petals like that - between the Burnt Orange ones but a bit higher than them.

5 Ruby petals like that.

And 4 Cinnamon petals like that.

To finish of put some glitter glue to cover the silicon glue.
Leave to dry. To be on the safe side put aside for about 2 hours.


Photo from a different angle.


That's what you can do with a flower like this one.


All you need to do to be in with a chance of winning one of our fabulous prizes is:

Share a tip
then leave the direct link to your tip/creation on the inlinkz below. Remember the rules...
  1. Create a new blog post on your blog with your Top Tip
  2. Put a direct link to that post using InLinkz below
  3. Make sure there is a link on your post to www.toptiptuesday.blogspot.com
Please, do not use old posts. Only new posts will be eligible to win the prize. Any old dated posts will be removed.
I hope you like my tutorial and I can't wait to see your fantastic tips.  Remember, if you use my tutorial, please email us at toptiptuesday@blogspot.com so we can see!