Dark Chocolate Shortbread


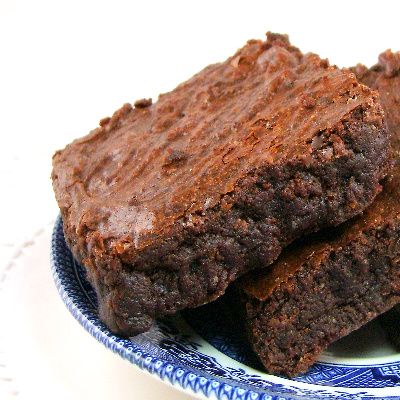
From the kitchen of One Perfect Bite...I first made this shortbread for a friend who enjoyed afternoon tea. She also loved chocolate and challenged friends who baked to make a chocolate shortbread that would be good enough to serve at a tea she was planning as a fundraiser. Now, I must admit, the only reason I agreed to participate in the challenge was that I already had a recipe that I knew worked and I was more than happy to share it with others. The recipe originally came from Gourmet magazine and it can now be found on Epicurious, which seems to have become the repository for all of Gourmet's published recipes. If you decide to make these cookies you might want to review the comments about the recipe which you can find here. I've made this shortbread at least ten times without incident, so I thought I'd share a few things I've learned with you. Some folks have problems with the cookies spreading as they cook. I chill my dough in the freezer on thin baking sheets for 30 minutes before baking. I let it sit, for 5 minutes or so, at room temperature before docking the formed cookie dough and baking the discs. I've never had a problem with the dough spreading as it bakes. As silly as it may seem, I also make sure that the disks I bake are exactly 6 inches in diameter and religiously follow baking and cooling instructions that are given in the recipe. Again, I've had no problems. This is a lovely shortbread and I know you'll really enjoy it if I can get you to try it. It is very easy to make. Here's the recipe.

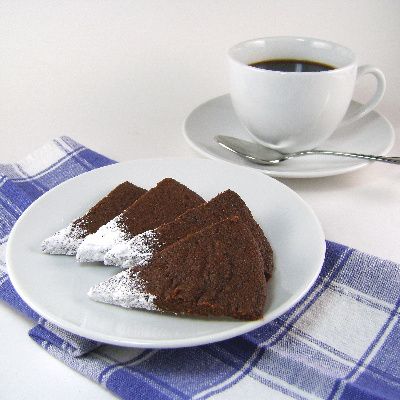
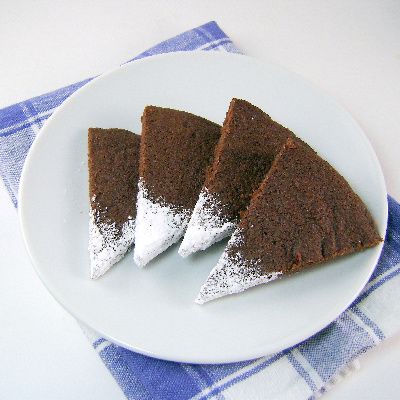
Dark Chocolate Shortbread...from the kitchen of One Perfect Bite courtesy of Gourmet magazine

Ingredients
1 stick (1/2 cup) unsalted butter, softened
1/4 cup superfine granulated sugar
1/2 teaspoon vanilla
1/8 teaspoon salt
3/4 cup all-purpose flour
1/4 cup unsweetened Dutch-process cocoa powder

Directions
1) Blend butter, sugar, vanilla, and salt in a bowl with a fork until combined well. Sift flour and cocoa into butter mixture and blend with fork just until mixture forms a soft dough.
2) Divide dough in half and pat out with floured fingertips into 2 (6- to 6 1/2-inch) rounds on an ungreased large baking sheet. Chill dough, uncovered, until firm, about 30 minutes.
3) Preheat oven to 375 degrees F. while dough chills.
4) Prick dough all over with fork and bake shortbread disks in middle of oven until centers are dry when touched and edges are slightly darker, about 15 minutes. Cool on baking sheet on a rack 10 minutes, then cut each shortbread into 8 wedges with a large heavy knife. Transfer to rack to cool. Yield: 16 coookies.

You might also enjoy these recipes:
Chocolate Toffee Shortbread Bars - Annie's Eats
Shortbread Berry Tarts - Sydney's Kitchen
Shortbread Toffee Bars - Karista's Kitchen
Shortbread Lemon Tart - Sweet Sensations
Buttery Lavender Shortbread - The Purple Foodie
Millionaires Shortbread - Delicious Dishings

Chocolate Peanut Butter Torte


From the kitchen of One Perfect Bite...My favorite dessert are, for the most part, European and barely sweet. I love those made with lemon, nuts or fruit and if you wrap them in a crisp and crackly crust, I'll follow you anywhere. That being said, there are also a handful of other, less classic, desserts that can cause me to fall from grace. This Chocolate Peanut Butter Torte is one of them, and, when it's in the house, my fall from grace is not a stumble, it's a free fall. I can't resist this torte. I really love the peanut and chocolate combination and when it's used as it is in this recipe, developed by Dorie Greenspan, just a bite has been known to make my socks go up and down. While there are several steps required to make this torte, they are simple and quite easy to do. I don't make it a habit to rewrite recipes of this caliber. Pastry chefs are exacting in their measurements and execution, and I have no problem following them, if the flavors being proffered are to my liking. I did make a substitution here that I want to talk about a bit. It has to do with chocolate crumbs that are used to make refrigerator pies or cheesecakes. Many of the better recipes use chocolate wafer crumbs to line pie plates or spring form pans. If you live in an area where they are available, no harm, no foul. If they are not available, most of you already know you can use Oreo cookies, sans filling, as a replacement. The problem is that there is rarely a conversion table to tell you how many cookies are required to do that. I did a quick test to determine quantities of each that are necessary for an equivalence conversion. As it turned out the magic number is eleven. Eleven Oreos, stripped of their filling, equal 1 cup of crumbs when ground. It takes about 20 famous chocolate wafers to yield that same amount. Greenspan's recipe uses Oreo cookies to make crumbs. I had none in the house, so I had to fall back on my supply of chocolate wafers. It was a novel twist. I hope you'll try this recipe. It really is perfect for a special Valentine's Day dessert, Here's the recipe.

Chocolate Peanut Butter Torte...from the kitchen of One Perfect Bite courtesy of Dorie Greenspan

Ingredients:
Crust
1 box chocolate wafer cookies, processed into fine crumbs
1/3 cup unsalted butter, melted and cooled
Small pinch of salt
Crunch
1-1/4 cups salted peanuts, finely chopped, divided use
1/2 cup mini chocolate chips or finely chopped semisweet chocolate
2 teaspoons sugar
1/2 teaspoon espresso powder
1/4 teaspoon ground cinnamon
Dash of ground nutmeg
Filling
2 cups heavy cream
1-1/4 cups confectioners’ sugar, sifted
12 ounces cream cheese, at room temperature
1-1/2 cups creamy peanut butter (not natural)
2 tablespoons whole milk
Topping
1/2 cup heavy cream
4 oz. bittersweet chocolate, finely chopped

Directions:
1) To make crust: Preheat oven to 350 degrees F. Butter a 9-inch springform pan and place it on a baking sheet. Combine chocolate wafer crumbs, melted butter and salt in a small bowl. Toss with a fork to moisten crumbs. Press into a thin layer covering bottom and sides of springform pan to within 1-inch of rim. Freeze crust for 10 minutes. Bake in preheated oven for 10 minutes, then transfer to a wire rack and let cool completely before filling.
2) To make crunch: In another small bowl, combine 1/2 cup of chopped peanuts, mini chocolate chips, sugar, espresso powder, cinnamon and nutmeg. Toss with a fork to mix and set aside.
3) To prepare filling: In bowl of a stand mixer fitted with whisk attachment, whip 2 cups of cream until it holds medium peaks. Beat in 1/4 cup of confectioners’ sugar and whip until cream holds medium-firm peaks. Transfer cream into a separate bowl and refrigerate until needed. Wipe out (do not wash) mixer bowl, replace whisk with paddle attachment, and beat cream cheese with remaining 1 cup of confectioners’ sugar on medium speed until cream cheese is satiny smooth. Beat in peanut butter, whole milk, and 1/4 cup of chopped peanuts until well combined. Using a large rubber spatula, gently stir in about 1/4 of whipped cream to lighten mousse. Still working with spatula, stir in crunchy peanut mixture from step 2 above, then gingerly fold in remaining whipped cream. Scrape mousse into crust, mounding and smoothing top. Refrigerate for at least 4 hours or overnight; cover with plastic wrap as soon as the mousse firms.
4) To make topping: To finish torte, put chopped bittersweet chocolate in a heatproof bowl set over a saucepan of simmering water. Leave bowl over water just until chocolate softens and starts to melt, about 3 minutes; remove bowl from saucepan. Bring reserved 1/2 cup of cream to a full boil. Pour cream over chocolate and, working with a rubber spatula, very gently stir together until ganache is completely blended and smooth. Pour ganache over torte, smoothing with a metal icing spatula. Scatter remaining 1/2 cup peanuts over top and chill to set topping, at least 20 minutes. When the ganache is firm, remove the sides of the springform pan. Refrigerate until ready to serve. Yield: 8 to 10 servings.

You might also enjoy these recipes:
Chocolate Peanut Butter Bars - The Parsley Thief
Peanut Butter Pecan Biscotti - Joy the Baker
Peanut Butter Chocolate Macarons - Annie's Eats
Peanut Butter Brownie Pie - What's Cookin' Chicago?
Peanut Butter and Jelly Truffles - A Mingling of Tastes
Peanut Butter Crunch Truffles - Piece of Cake

Chocolate Cheesecake Squares


From the kitchen of One Perfect Bite...I'm going to begin the chocolate extravaganza with one of the easiest recipes I'll be featuring this week. It's not a flashy or rich dessert, but I decided to include it for those of you who will be baking for Valentines who are, or should be, dieting. This is by no means diet food, but the squares are definitely lighter than their full-fat cousins. The recipe was developed by Martha Stewart and it uses reduced fat dairy products and unsweetened cocoa powder to make these light, but rich tasting, squares that taste far more like cheesecake than brownies. While they won't set your world on fire, the brownies are a nice alternative for those of you who are counting fat grams and calories. I've played ever so slightly with the original recipe. The first few times I made these brownies, I used sour cream, but found its tang to be off-putting. I solved that problem by using a low fat creme fraiche in its place. In order to get a richer chocolate flavor I also upgraded the cocoa powder I was using. I switched to Guittard products because that was what was available to me. I'm not touting this brand, but I do want you to know that this is a recipe where it pays to use the best chocolate you can get your hands on. If your ingredients are at room temperature, you can have the brownies in the oven in about 15 minutes. I found mine took a few minutes longer to cook than the recipe had indicated, but they were out of the oven in 45 minutes. I let them cool at room temperature for about an hour and then let them chill for an hour longer before cutting them. I think you'll like these. They are certainly worth a try. Here's the recipe.

Chocolate Cheesecake Squares...from the kitchen of One Perfect Bite inspired by Martha Stewart

Ingredients:
Nonstick cooking spray
8 chocolate wafer cookies
1 brick (8-ounces) reduced-fat cream cheese
1 cup reduced fat creme fraiche
1/2 cup unsweetened cocoa powder
2 tablespoons corn starch
3/4 cup sugar
1/4 teaspoon almond extract
1 large whole egg plus 1 egg white
1/3 cup semisweet chocolate chips

Directions:
1) Preheat oven to 325 degrees. Coat an 8-inch square baking pan with cooking spray. Line with two crisscrossed pieces of parchment or wax paper, spraying between the sheets. Spray lined pan and set aside.
2) Process cookies in food processor until finely ground. Gently press crumbs into bottom of prepared pan (it is not necessary to rinse the processor bowl).
3) Blend cream cheese and creme fraiche until smooth, scraping down sides of the bowl as needed. Add cocoa, cornstarch, sugar, almond extract, egg and egg white and process until smooth. Pour into pan and sprinkle with chocolate chips.
4) Bake until just set, 35 to 40 minutes (mine took 45 minutes). Cool completely in pan. Refrigerate at least 1 hour. Invert onto tray, peel off paper and reinvert crust side down. Cut into 9 squares. Yield: 9 servings.

You might also enjoy these recipes:
Bon Appetit Brownies - Cookie Madness
Double Chocolate Walnut Brownies -- Elana's Pantry
Deep, Dark Chocolate Espresso Brownies - Confessions of a Kitchen Witch
The Healthy Brownie - Squirrel Bakes
Thomas Keller's Ad Hoc Brownies - Lawyer Loves Lunch
Hazelnut Brownies - Baking and Boys
The Best Cocoa Brownies - The Sophisticated Gourmet
Nutella Fudge Brownies - Life's a Feast
Nutella Crunchie Brownies - Chow and Chatter

Killer Nachos


From the kitchen of One Perfect Bite...These nachos got their name because the better than pound of cheese used to make them will put you in an early grave. I jest. I think. My family is famous for prefacing the name of any snack made with more than three ingredients with the word "garbage". They mistakenly believe, despite having had the education of princes, that the word is an adjective. Hence, it happens that I have, on occasion, unwittingly served "garbage" from my kitchen. If it's really good garbage, they drop that descriptor and replace it with another of their favorites, "killer". I'm glad I know who their mother is, because there are times their parentage is definitely suspect. At any rate, nachos are a popular snack in this area and I've included them in my Super Bowl menu because so many of our friends expect them. Nachos, even killer nachos, are an assembled snack and once the chopping is done they are an easy game day treat. My recipe is much like all the others that I've seen, save for the fact that I use spicy pepper jack cheese in their assembly. I like the discreet heat the cheese adds to the nachos and it's an easy way to spice up the dish. This is something I make only when we have guests, and to assure that everyone, including the Silver Fox and me, gets at least a few of the fully loaded chips, I make one basket for every four people who are with us for the occasion. These are best constructed just before heating and serving, and it helps to make sure that those things you add to the mix are as dry as they can possibly be. I'm not a big fan of soggy anything and I've had some limp nachos in my time. I've borrowed the quantities used in this recipe from Squidoo, a community website. While the thought of a recipe for nachos may seem silly, it is a great help in determining the quantity of ingredients you need to feed a gang. So, without further ado, I give you the recipe for Killer Nachos.

Tomorrow marks the beginning of our chocolate extravaganza for Valentine's Day. Don't miss it.

Killer Nachos...from the kitchen of One Perfect Bite and the gang at Squidoo

Ingredients:
1 pound lean ground beef
2 teaspoons chili powder
2 teaspoons cumin
Pinch of salt
1 small can refried beans or bean dip
1 10 or 12-ounce bag corn tortilla chips
1-1/4 pounds pepper jack cheese, grated
1 large onion, chopped
2 tomatoes, juiced and chopped
1 6-ounce can black olives, drained and chopped

Directions:
1) Brown ground beef in a medium skillet. Drain. Add chili powder, cumin and salt. Set aside.
2) Spread a thin layer of refried beans or bean dip over bottom of a platter or shallow, heat-proof bowl to anchor first layer of chips.
3) Then spread a layer of chips over beans, top with a layer of cheese, ground beef, onion, tomato and olives. Repeat until all ingredients are used. Or, since this recipe usually makes about 4 layers, you can divide all toppings into 4 portions for even layering.
4) Microwave on high until heated through, about 10 minutes, or bake at 375 degrees F. for 20-30 minutes. Serve warm with sour cream and guacamole dip, if desired. Yield: 4 to 6 servings.

You might also enjoy these recipes:
Roasted Garbanzo Beans with Cajun Spice - One Perfect Bite
Simple Roasted Almonds - Design Wine and Dine
Super Bowl Snacks: Parmesan Crisps - My Man's Belly
Garlic Lime Chicken Wings - Life's Ambrosia
Spicy Garlic Hot Wings - Sea Salt with Food
Ranch Popcorn - 400 Calories or Less
Chili: A Game Day Classic for Super Bowl - The Delightful Repast

Dulce de Leche Ice Cream


From the kitchen of One Perfect Bite...I've made a slight change to the dessert menu for Super Bowl Sunday. Rather than serve sundaes, I've decided to make ice cream sandwiches using dulce de leche ice cream and chocolate wafer cookies. I think they'll make for easier clean-up and might actually be a better fit for our extremely casual menu. This is, hands down, one of the easiest and best ice creams I've ever made. It uses no sugar or eggs, and its sweetness comes from dulce de leche, a thick, caramel flavored sauce that is popular in Latin America. The canned sauce can be found in most large grocery stores, but it can also be made quite easily at home. Homemade versions of the sauce are the only available option for folks living in areas where dulce de leche is not available or is too expensive for them to purchase. The classic sauce is a mix of milk and sugar that is cooked and stirred for hours on end. The sauce that I use is much easier and can be made in one of two ways. Both begin with cans of sweetened condensed milk that are stripped of their paper labels. To make the stovetop version, you'll need to poke two small holes in the lid of a condensed milk can and place it, upright, in a heavy bottomed pot that's been filled with water that comes about a quarter of an inch below the top of the can. The milk is simmered in the can for 3 hours and during that time the water level is kept constant. The method I use is simpler still. I place the cans on their sides in a 5 quart crock-pot, cover them with hot water by at least an inch and cook them, covered, on HIGH power for eight hours. Whichever method you use, be careful when removing the cans from water. They are screeching hot and can cause severe burns. When the cans come to room temperature the sauce, which will be quite thick, is ready to use. It is dissolved in a mixture of milk and heavy cream and quick-chilled before being poured into an ice cream maker. I think you'll like this ice cream. It is delicious and nearly effortless to make. The recipe was originally developed by Mariana Crespo for Gourmet magazine. Here's how the ice cream is made.

Dulce de Leche Ice Cream...from the kitchen of One Perfect Bite, courtesy of Mariana Crespo

Ingredients:

2 cups whole milk
1 cup heavy cream
1-2/3 cups dulce de leche (store bought or homemade)
1/8 teaspoon pure vanilla extract
3/4 cup chopped pecans (2 1/2 to 3 oz), toasted

Directions:
1) Bring milk and cream just to a boil in a 3-quart heavy saucepan over moderate heat, then remove from heat and whisk in dulce de leche until dissolved. Whisk in vanilla and transfer to a metal bowl. Quick-chill by putting bowl in a larger bowl of ice and cold water and stirring occasionally until cold, 15 to 20 minutes.
2) Freeze mixture in ice cream maker until almost firm, then fold in pecans.
3) Transfer ice cream to an airtight container and put in freezer to harden, at least 1 hour. Yield: 1-1/2 quarts.

You might also enjoy these recipes:
Dulce de Leche - David Lebovitz
Dulce de Leche - Cooking for Engineers
Mexican Chocolate Brownies - One Perfect Bite
Mexican Wedding Cookies - Stylish Cuisine
Mexican Hot Chocolate - Elana's Pantry
Dulce de Leche Liqueur Bundt Cake - The Daily Dish
Mexican Milk Chocolate Cake - Sugar Plum
Mexican Chocolate Cake - Bless Us O Lord
Simply Amazing Fried Ice Cream - $The Thrifty Couple in the Kitchen

Mexican Chocolate Brownies


From the kitchen of One Perfect Bite...Food for themed get-togethers rarely causes a problem for a host or hostess, though dessert can occasionally be a challenge. It would be a bit ludicrous to serve flan with football fare, so over the years I've found or developed recipes a bit more fitting for these informal gatherings. My dessert plans for our Southwestern-style Super Bowl gathering, include a moist fudge-type brownie made with Mexican chocolate and ground chiles, and a homemade dulce de leche ice cream that I'll serve with a salted caramel sauce. I'll save the recipe for the ice cream for another day and just concentrate on the brownies tonight. Mexican chocolate can be difficult to find, so rather than rely on the vagaries of the market place, I use a recipe whose ingredients create a reasonable facsimile of the real deal. I think most of you would agree that brownies are among the easiest desserts that can be made. This one is no exception. My recipe for Mexican chocolate brownies is inspired by one that appeared in Gourmet magazine over 15 years ago. While it is not my favorite brownie, it is my favorite for Mexican or Southwestern themed events. I've simplified the original recipe by using store-bought almond meal, and I have added a small amount of ground chili to give the brownies an authentic flavor punch. The chocolate-chili combination is not unusual in Mexican desserts and the flavors work well together. Do not use your standard chili powder to make these brownies. It contains cumin and other additives that don't work well with the chocolate. If you cannot find a New Mexico or an Ancho chili powder, a very small amount of cayenne pepper can be substituted. These brownies are dense and moist and almost like a confection. I think they are deliciously different. I hope you will too. Here's the recipe.

Mexican Chocolate Brownies
...from the kitchen of One Perfect Bite, inspired by Gourmet Magazine

Ingredients:
3/4 stick (6 tablespoons) unsalted butter, cut into pieces
3 ounces fine-quality bittersweet chocolate (not unsweetened), chopped
2 ounces unsweetened chocolate, chopped
1 cup sugar
1/2 cup almond meal
2 large eggs
1/2 cup all-purpose flour
1/2 teaspoon salt
1/2 teaspoon cinnamon
1/4 to 1/2 teaspoon ground pure chili powder (i.e. New Mexico or Ancho)

Directions:
1) Preheat oven to 350 degrees F. Butter and flour a 9-inch square baking pan, knocking out excess flour. Set aside.
2) In a heavy 1-1/2-quart saucepan melt butter and chocolate over low heat, stirring, until smooth. Remove pan from heat and let chocolate cool for 10 minutes.
3) Combine almond meal and sugar in bowl of a food processor and pulse to combine. Stir mixture into chocolate mixture. Add eggs, one at a time, beating well with a wooden spoon until mixture is smooth and glossy. Stir in flour, salt, cinnamon and chili powder until just combined.
4) Spread batter evenly in pan and bake in middle of oven 25 to 30 minutes, or until a tester comes out with crumbs adhering to it. Cool brownies completely in pan on a rack before cutting into 16 squares. Brownies keep, layered between sheets of wax paper in an airtight container at cool room temperature. Yield: 16 brownies.

You might also enjoy these recipes:
Mexican Wedding Cookies - Stylish Cuisine
Mexican Hot Chocolate - Elana's Pantry
Dulce de Leche Liqueur Bundt Cake - The Daily Dish
Mexican Milk Chocolate Cake - Sugar Plum
Mexican Chocolate Cake - Bless Us O Lord
Simply Amazing Fried Ice Cream - $The Thrifty Couple in the Kitchen

FIST CITY


check out this video of our loretta lynn cover "fist city" that we've been doing on this tour!
country pride.

Crock-Pot Pork Posolé


From the kitchen of One Perfect Bite...A traditional Posolé is a spicy stew that's made from hominy, chilies and some type of meat or poultry. Hominy is dried corn that has been softened by soaking it in a mild lye solution. The process separates the hull and germ from the kernel, leaving behind corn kernels that can then be dried and reconstituted for cooking at another time. Hominy is the foundation on which a good posolé is based. The soupy stew is very popular in Mexico and the desert Southwest and, when it's properly made, it can be delicious. I've decided to serve posolé, along with Sonoran hot dogs and super nachos to our guests on Super Bowl Sunday. I hasten to add that my version of this famous stew is not traditional. I add peanut butter and a mole sauce to mine which gives it a more distinctive and unusual flavor. I first tasted the stew with these additions at a competition, and, once I'd sampled it, I knew I would have to incorporate them into my own recipe. I really love this dish. It's a great way to feed a crowd who might be tired of chili, and it is even easier to make. If you wish, the stew can be braised in the oven, rather than cooked in a crock-pot. My only caution is a reminder. While, you can always add more heat, once the chilies are in the pot they are there to stay. So, please use the jalapenos judiciously. Most of you will love this stew. Here's the recipe for those of you who would like to try it.

Crock-Pot Pork Posolé...from the kitchen of One Perfect Bite, inspired by Marybeth Mank

Ingredients:

2 tablespoons extra virgin olive oil
2 pounds boneless pork shoulder, cut into 1-inch pieces
1 large white onion, chopped
3 cloves garlic, minced
3 medium carrots, peeled and cut into 1/2-inch
1 red bell pepper, seeded and cut into 1/2-inch dice
2 (14.5-oz.) cans hominy, white or gold, drained and rinsed
1 (14.5-oz.) can diced tomatoes, undrained
1 (15.5-oz.) can kidney beans, undrained
2 tablespoons diced jalapeno or other green chilies
2 tablespoons tomato paste
1/4 cup creamy peanut butter
1/2 cup jarred prepared mole (mole can be found in Latin section of your grocery store) the grocery store]
2 teaspoons ground cumin
1 teaspoon dried oregano
1/2 teaspoon chili powder
1/2 teaspoon cinnamon
4 cups reduced sodium chicken broth
Optional Garnish:
Sour cream
Fresh chopped cilantro

Directions:
1) Spray 5-quart crock-pot with nonstick cooking spray. Heat olive oil in a large skillet set over medium heat. Add pork and saute until browned on all sides, about 10 minutes. Transfer to crock-pot. Add onions, carrots and garlic to pan and cook until softened, about 5 minutes. Transfer to crock-pot. Stir in bell pepper, hominy, tomatoes, kidney beans and jalapenoes. Mix well.
2) In a separate bowl, combine tomato paste, peanut butter, mole sauce, cumin, oregano, chili powder, cinnamon and 2 cups chicken broth. Whisk until thoroughly combine.Stir in remaining 2 cups broth. Pour over mixture in crock-pot and stir to combine.
3) Cover crock-pot and cook on LOW for 6 hours, or on HIGH for 3 hours. The completed posolé should have the consistency of a stew. If it is too thick, thin with additional chicken broth or water. If too watery, dissolve 2 tablespoon of flour in 1/4 cup broth. When smooth add 2 cups of liquid from stew and stir until smooth. Return to pot and cook until posolé comes to a simmer and thickens slightly, about 10 minutes. Ladle into warm bowls and garnish with sour cream and cilantro. Serve with warm tortilla or cornbread. Yield: 8 to 10 servings.

You might also enjoy these recipes:
Mexican Chicken Wrap - The Life of a Foodie and Her Family
Chicken Tortilla Casserole - Christine's Cuisine
Tostadas - The Farmer's Wife
Caldo de Res - Cooking in Mexico
Mole Chicken - Real Food Whole Health
Tortilla Soup - Katy's Kitchen

This post is also being linked to:
Crock Pot Wednesday at Dining with Debbie

Top Tip #19 - Making flowers out of Hearts & Fabulous Flowers Challenge

Hello everyone!

How you doing this week?  Looking for an easy challenge to get your creative juices flowing?  Well then, stop right here we have a great one for you this week!

Before I share with you the tutorial and the challenge, I just need to mention that sadly, a few of your wonderful entries had to be removed as they did not follow the rules.  You can only submit 3 cards into our challenge, any more will mean that they are removed from the challenge.  I hate doing that, but to make it fair to everyone, I have to remove them.  Please, only enter up to 3 times - thank you!!

Its my turn, Leanne, to share a tutorial with you, so this week I am going to show you how to make your own flowers out of hearts!  Therefore, our challenge this week is:

Fabulous Flowers!

As long as your creation has a flower on it, whether its 1 or 101, then you can enter this challenge!  It can even be a flower on the DP you use!  Lets show the crafting world our Flower Power!!


So, I absolutely adore flowers and am always looking to find a way to make my own flowers as over here in Dubai, there is only one craft shop and its sooooooooooo expensive!  So after some playing around with some shapes, I came up with using hearts to make a flower!

1.  You need heart shapes in 3 different sizes.  I have gone for 1.25 inches, 1 inch and .75 inch. You need 3 of each size (I have also made these flowers using 5 different sizes for a really great bulky flower).You also need a pokey tool and a brad that has a long stem on it.  Its good if you use double sided card, but thats up to you!


 2.  Next, poke a hole just a bit up the heart away from the point, this will be for your brad to go through.

 3.  Next, scrunch them all up!


4.  Next, open them out and then start layering them onto the brad.  Start with the smallest heart size first, then the next size, then the next until it looks like this....

5. Now its starting to look like a flower!!  I love more grungy looking ones, so its up to you if you stop like it is or carry on.  Next, I squish each separate heart shape around the brad - like this...
6.  Now open it out - it will look like this...
7.  Now you can keep scrunching the flower, add glitter, anything you like till you are happy with it!  How easy is that?  I love to be able to make these in the same colour that I have used on my cards.  Here is the finished one!

Hope you liked it!

This week we are lucky to have 2 brand new sponsors and 4 prizes to give away!!!

Wink Wink Wink are offering 3 prizes of 3 stamps (up to $15) of the winners choice!

A bit about Wink Wink Wink:  *Wink *Wink Ink is a brand new digital stamp company as of January 2010.  Our images are original, well drawn, and clear with a style you won't find anywhere else!   If you like animals, children and fantasy creatures you will love our stamps!  New stamps are added to our store weekly, so there is always something new to see!  All images are 300 dpi and come in 3 versions- black and white jpg for coloring, transparent png for layering on all your digital creations, and a colored jpg for use as a coloring guide or print and embellish for quick beautiful projects in no time flat!  We hope you stop on by and visit us soon at www.winkwinkink.com!    

Our featured tipper prize this week is

Michelles Scrapbooking & More who is offering our featured tipper a $15 voucher to spend in her store


A little bit about Michelle: Michelles Scrapbooking & More is the home of The Pixie Cottage Stamps. In addition, we carry a wide variety of paper crafting products, including Copics, Spellbinders, Magnolias, Basic Grey, Kaisercraft, Sizzix, Provocraft and much more.  Customer service is a priority for our store. Stop by and see what we have to offer!


Here is some inspiration from the DT Team 2

Vee

Maggie

Samantha 


Carol

Paula

Heike

Remember, all you have to do to win a prize is:
  1. Create something using the theme of the challenge
    OR
  2. leave a tip (using the comment section)
    OR
  3. do both!!

    You can now only enter the challenge 3 times -  just as long as its a new creation - any back dating creations (before today's date) will be removed.

    You must also do a link to Top Tip Tuesday on your creation post.
Only someone leaving a tip can win the featured tipper prize - you can leave your tip via the comment section of the post.
Remember, there is also the chance to be one of our Top 3 creations as well!!

Thanks for stopping by and we can't wait to see your fabulous creations!!!

You have until 11pm (UK Time) on Monday 31st January to enter - so go on, get creating!

Winner, Featured Tipper & Top 3 from Tip #18


Woo Hoo - another fab week we had looking at your creations...I'm so glad that we have decided to start doing a Top 3!!!

So, onto the winners:


This weeks winner, chosen by Random.org is:

Congratulations - you have won 5 digis from Pink Cat Studio!

Carols extra little prize which she is giving to someone who made a wordbook after following her tutorial goes to:


Sally, please can you head over to Carol's blog to contact her about your mystery prize!


This weeks featured tipper prize from Cathrine Pooler one months subscription to Club Inbox! Goes to:


Whose tip was: My top tip this week is to keep the ribbons from inside your new clothes that hold it on the hanger ... you'll be amazed at the selection of different colours you'll amass and you'll have something that matches your project 9 times out of 10!

Please can the winners e-mail me at toptiptuesday@gmail.com so that I can arrange to have your prizes sent to you!


Now, onto the fabulous top 3 of last week.  Well, it was very hard to choose - there are so many talented crafters out there.  So our Top 3, in no particular order are:


Aren't they just stunning!  Ladies, please remember to take your Top 3 Badge from the sidebar!!


 Remember to come back later when it is my turn, Leanne, to do this weeks tutorial!!

See you at 8.30!!

Sonoran Hot Dog


From the kitchen of One Perfect Bite...This is the type of recipe that will cause hardcore foodies to bristle and run for the exits. True, hot dogs are not the stuff of which their dreams are made, so I can't blame them. There are, however, occasions when nothing is quite as satisfying as good old-fashioned grub, so, I'll clear a path and hold the doors for them as they leave the room. I've been mulling what to make for Super Bowl Sunday and I've finally got a fix on what I want to serve. Last year, I did variations of those dishes I lovingly call Asian junk food. There were plates of egg rolls, crab rangoon, barbecued pork and dumplings, as well as bowls of fried noodles served with a warm apricot dipping sauce. This year, mainly because Chinese New Year is also barrelling down on us, I decided I'd head down Mexico way and do a Southwestern feast. Robb Walsh developed a recipe for Sonoran hot dogs that I've wanted to try for the longest time and I thought they'd be perfect for Super Bowl Sunday. I did a test run tonight and am comfortable enough with the results to share the recipe with you. This is a dish that is, for the most part, assembled rather than cooked. You'll have to heat the oven and a frying pan, but the time consuming elements of this dish can be purchased ready made and simply layered into warm and waiting buns. I have access to Mexican bakeries where bolillos, the Mexican version of a torpedo roll, can be purchased. They are a perfect bun for this outrageous hot dog. They are thick enough to hold ingredients without disintegrating, but small enough to prevent the filling from being upstaged by the bread. I realize that most of you don't have access to specialty bakeries, so the best route for you to take is to buy sturdy, but soft, buns that are approximately the same size as your hot dogs. As long as the hot dogs don't sit too long before serving you'll be fine. Good hot dogs are important and those that "answer to a higher authority" would be an excellent choice to use here. You will also find these much easier to make if you use a really thin-sliced bacon. Hassles with layering can be avoided if you have everything set to go before you begin cooking the hot dogs. The original recipe calls for pan grilling the wieners on a comal, the griddle on which tortillas are cooked. I cooked mine under the oven broiler to simplify things and contain the mess. It works perfectly, as long as you rotate the hot dogs so all their surfaces cook. I really think you'll like these. I hope you'll give them a try. Here's the recipe.

Sonoran Hot Dogs...from the kitchen of One Perfect Bite inspired by Robb Walsh

Ingredients:
3 tablespoons mayonnaise
1 teaspoon Tabasco or other hot sauce
Juice of 1 large lemon
8 all-beef wieners (fat ones work better than long ones)
8 slices extra-thin bacon
8 torpedo rolls or bolillos
1/2 cup warm refried beans
1 cup guacamole
1/2 cup grated jack or cheddar cheese
1/2 cup chopped onion
1/2 cup chopped tomato
1/2 cup Salsa Verde

Directions:
1) Mix mayonnaise, Tabasco, and lemon juice and put into a squeeze bottle.
2) Wrap hot dogs with bacon slices, covering completely. Grill or broil them, rolling hot dogs until bacon is crunchy on all sides, about 7 minutes.
3) Cut a pocket into buns to form a "boat" and toast them in oven or on a grill.
4) When hot dogs are cooked, divide beans and guacamole among eight rolls, spooning them inside pocket and spreading on either side of rolls. Spread cheese down the middle. Using tongs put one piping-hot bacon-wrapped hot dog into pocket of each roll. Top each with onions and tomatoes. Spread Salsa Verde across top. Apply mayonnaise blend in squiggles over tops of hot dogs. Yield: 8 servings.

You might also enjoy these recipes:
Chimichanga Dogs - Girlichef
Dogzilla Hot Dogs - Mrs. Regueiro's Plate
Andersen Hot Dogs: Gourmet Style - Kalle Bergman's Honest Cooking
Seriously Scandinavian: Hot Dogs from the Cold North - Kalle Bergman's Honest Cooking
Chicago Red Hots - Food Nerd Ciao
Ultimate Bacon Cheese Dogs - Gourmet Mom on the Go
Spicy Mango-Pineapple Hot Dogs - Coconut and Lime
Coney Dogs - Real Mom Kitchen
Fancy Hot Dogs - Simply Recipes
Classic Chicago Hot Dog - Easy and Tasty Food

Hot dog lovers will want to see this feature in Bon Appetit: Global Hot Dog Guide

CRAZY FOR YOU PHOTOS