German Chocolate and Almond Cocoa Cream Cake


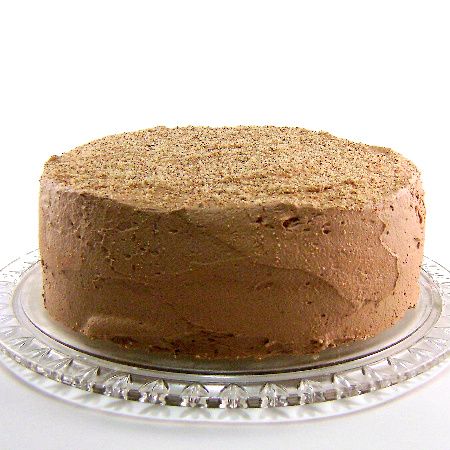
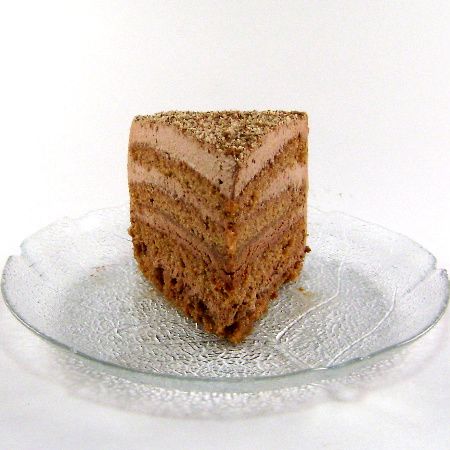
From the kitchen of One Perfect Bite...Over time, I've collected many recipes and lots of ideas from Taste of Home magazine. The recipe for this cake, originally called Chocolate Lover's Delight, was developed by Sandra Hackney and it appeared in the magazine about a year ago. It's a wonderful cake and the recipe featured below is the one that was published in the magazine. What I want to talk about, however, is how the processes of making this delicious cake can be simplified. I have never found that German chocolate produces especially flavorful cakes. As a matter of fact, I think cake layers made with this type of chocolate are merely colorful vehicles for highlighting the tastes of other fillings and frosting. I've made this cake several times now, and I can tell you with certainty, that the icing is what sets this cake apart from others you may have tried. The secret to this cake is found in its grace notes, not in its layers. With that in mind, I decided to try the cake using a German chocolate cake mix. I made the cake following directions on the back of the box, save for the fact that I used three, rather than two, 9-inch cake pans to hold the batter. I've found that doing this eliminates the need to split layers once the cake has cooled. This of course alters baking time. Mine take about 20 minutes to bake, but timing is a fickle thing and you'll want to watch your layers carefully. The almond flavor in the finished cake comes from almond extract, so I've also decided to eliminate the ground almonds used to sprinkle on the layers. They add cost, not flavor, to the finished cake and have no texture that might make their use worthwhile. In the interest of transparency, I must tell you that I made extra icing, increasing the recipe by 1/2, to assure discernible layers and complete coverage of the cake for its photograph. I hope that, in its original or simplified form, you'll give this cake a try. It is really delicious. Here's the original recipe.

German Chocolate and Cocoa Cream Cake
...from the kitchen of One Perfect Bite courtesy of Sandra Hackney

Ingredients:
Cake Layers
1-1/2 cups sugar, divided
1 cup buttermilk
1/2 cup canola oil
2 eggs, separated
2 ounces German sweet chocolate, melted
1 3/4 cups flour
1/4 teaspoon salt
1/8 teaspoon salt
1/4 teaspoon baking soda
Frosting and Filling
2 cups heavy whipping cream
1 cup confectioners' sugar
1/3 cup baking cocoa
1/4 teaspoon almond extract
1/4 cup Creme de Cacao
1/2 cup ground almonds

Directions:

1) Grease and flour two 9-in round cake pans; set aside. In large bowl, beat 1 cup sugar, buttermilk, oil, egg yolks, and melted chocolate till blended. Combine flour, 1/4 teaspoon salt, and baking soda; gradually beat into sugar mixture till blended.
2) In large bowl with clean beaters, beat egg whites till soft peaks form. Gradually beat in remaining sugar, 1 tablespoon at a time, on high till stiff peaks form. Fold into batter.
3) Transfer to pans. Bake at 350 degrees for 18-22 minutes or till a toothpick inserted in the middle comes out clean. Cool for 10 minutes before removing from pans to wire racks to cool completely.
4) For frosting, beat cream, powdered sugar, cocoa, extract, and remaining salt till stiff peaks form.
5) Cut each cake horizontally into two layers; brush layers with cream de cacao. Place bottom layer on a serving plate; top with 1/2 cup frosting and sprinkle with 2 tablespoons almonds. Repeat layers twice. Top with remaining cake layer. Spread remaining frosting over top and sides of cake; sprinkle remaining almonds over the top. Yield: 10-12 servings.

You might also enjoy these recipes:
German Chocolate Cake - Lisa Is Cooking
German Chocolate Mousse and Valentine's Cookies - Nutritious Eats
German Chocolate Cake Macarons - Wives with Knives
German Chocolate Pie: Grannie's Recipe - Cooking with K
German Chocolate Cupcakes with Coconut Almond Icing - Barbara Bakes
Small German Chocolate Cake - Cookie Madness
Death By German Chocolate Brownie-Cookie - It's A Big Cookie, Dude
German Chocolate Ice Cream Cake - Sugar Plum Blog
What is German's Chocolate? - Baking Bites
German Chocolate Cake Brownies - Baking Bites

Spotted Dog


From the kitchen of One Perfect Bite...If my mail is any indication, many of you are curious as to how the English version of Irish soda bread came to be called Spotted Dog. Surprisingly, no one seems to know for sure. My research came up with a lot of guesses, some educated, others not. We know for certain that a staple of old English kitchens was a steamed pudding that, when made with raisins, was called a Spotted Dick. While many are offended by the name, linguists seem to agree that it really was derived from the word pudding. According to Dex at The Straight Dope, over the course of time, pudding became puddink, puddink became puddick and puddick , finally shortened, became dick. Fortunately, there was another version of the pudding whose name could offend no one. It was made with plums and suet and it was called a Spotted Dog. Why? From this point forward all the information you receive will be the product of my, as yet, undocumented imagination.


The pudding, and later the bread of the same name, bear spots like those found on a Dalmatian. Looking at these photos I have no trouble understanding why the bread, too, was called Spotted Dog. I personally think Dalmation Bread would have been a better, more expressive name, but then no one ever listens to me and, as a result, we still have these awkward language situations that must be dealt with. More's the pity :-). Today's recipe is for an embellished Irish soda bread. It contains raisins and caraway seeds, but it is less rich than many of the versions that are popular today. I like to view it as a historical footnote that falls somewhere between yesterday's wholemeal bread and the lovely cake-like loaf that Ina Garten makes here. Here's the recipe for those of you who are curious.


Spotted Dog...from the kitchen of One Perfect Bite

Ingredients:
4 cups all-purpose flour
1-1/21 teaspoons baking soda
1 teaspoon salt
1 tablespoon sugar
1-1/2 tablespoons caraway seeds
1 cup golden raisins
1-3/4 cup well-shaken buttermilk
2 tablespoons unsalted butter, melted

Directions:
1) Place rack in middle of oven and preheat to 375 degrees F. Butter and Flour a large baking sheet. Set aside.
2) Combine flour, baking soda and salt in a large bowl. Whisk in sugar, caraway seeds and raisins. Add buttermilk and stir until dough is moistened, but still lumpy.
3) Turn dough onto a lightly floured work surface and knead with floured hands until dough is less sticky but still soft, about 8 times. Divide dough into two pieces and form each piece into a ball. Pat each ball into a domed 6-inch round on prepared baking sheet, spacing them about 4-inches apart. Cut a large 1/2-inch deep x in top of each loaf with a sharp knife or razor blade. Brush both loaves with melted butter.
4) Bake until golden brown and bottom of loaves sound hollow when tapped, about 35 to 45 minutes. Cool on wire rack for at least 2 hours before slicing. Yield: 2 6-inch loaves.

You might also enjoy these recipes:
Chocolate Soda Bread - Real Epicurean
Browned Butter Soda Bread - Vanilla Sugar
Authentic Irish Soda Bread - Confessions of a Kitchen Witch
Oat Soda Bread - 101 Cookbooks
Irish Soda Bread - The English Kitchen
Brown Bread - David Lebovitz
Soda Bread - Farmersgirl Kitchen
Irish Soda Bread Scones - Brown Eyed Baker
Irish Soda Bread Scones - Smitten Kitchen
Caraway Soda Bread - Simply Recipes
Oats and Honey Irish Soda Bread with Raisins - Baking Bites

This post is being linked to:
Smiling Sally - Blue Monday

The Real McCoy - Wholemeal Irish Soda Bread


From the kitchen of One Perfect Bite...I know St. Patrick's Day is still weeks away, but I wanted to make sure that those of you who are tempted to try a real soda bread, have plenty of time to test recipes before selecting the one you'll finally use. I know it's hard to believe, but this is what a true Irish soda bread should look like. The addition of raisins, sugar and caraway is an English embellishment that produces a bread that should, more correctly, be called Spotted Dog. Irish peasants lived, for the most part, on a diet of potatoes, grains and milk. Bread appeared on their tables only during the summer, or "meal months", when potato stores had been exhausted. The bread was typically made in a lidded cast iron pot called a bastible, but in Northern Ireland it was shaped into a disk, called a farl, and scored with a cross to "let the devil out" as the bread rose and cooked. Our bread is devilishly good. This simple loaf is delicious when made with Irish wholemeal flour. Unfortunately, our (U.S.) whole wheat flour lacks the flavor of its Irish cousin and we have to fiddle and fudge to make a loaf that is anywhere near as flavorful. The good news is that it can be done by using a combination of flours, and boosting their flavor with oatmeal and wheat germ. The recipe I'm passing on to you was developed by Jeanne Lemlin and she has come up with a combination of grains that result in a typically Irish loaf. You'll find it to be wonderful, if you can clear your head and palate of long held notions of what a soda bread should be. There is nothing here but the flavor of the grain. One bite, and a slow and deliberate chew will convince you that nothing else is necessary. I love this and make it often. When we have guests, I serve it with Irish butter or a whipped cream cheese and a small platter of thinly sliced smoked salmon. I have, however, come to enjoy it completely unadorned. Plain or fancy, the bread should sit for 2 hours before slicing. It crumbles easily in the early stages of cooling, so it really needs this time to firm up. I really hope you'll try this bread. It is really wonderful. Like all soda breads, it stales quickly and is best enjoyed the day it is made. Here's the recipe.

Wholemeal Irish Soda Bread ...from the kitchen of One Perfect Bite courtesy Of Jeanne Lemlin

Ingredients:

1-1/4 cups unbleached all-purpose flour plus additional for sprinkling
1 cup whole-wheat flour
1/2 cup old-fashioned rolled oats
1/4 cup toasted wheat germ
1-1/2 teaspoons baking soda
1 teaspoon salt
1/2 stick (4 tablespoons) cold unsalted butter, cut into bits
1-1/3 cups well-shaken buttermilk or plain yogurt

Directions:
1) Move rack to center of oven and preheat to 425 degrees F.
2) Whisk together flours, oats, wheat germ, baking soda, and salt in a large bowl. Add butter and toss to coat with flour. Then blend in butter with your fingertips until mixture resembles coarse meal. Add buttermilk and stir until dough is evenly moistened, but still lumpy.
3) Knead dough on a lightly floured surface, dusting with flour to prevent sticking, 1 minute (dough should remain soft and slightly sticky). Shape dough into a ball. Pat out dough on a lightly floured baking sheet into a 7-inch round. Dust dough with flour and spread lightly over round with your fingertips. Cut a 4- to 5-inch X (1/2 inch deep) in top of dough.
4) Bake in middle of oven until bread sounds hollow when tapped on bottom, 35 to 35 minutes. Cool on a rack 2 hours before slicing. Yield: 1 loaf.

You might also enjoy these recipes:
Chocolate Soda Bread - Real Epicurean
Browned Butter Soda Bread - Vanilla Sugar
Authentic Irish Soda Bread - Confessions of a Kitchen Witch
Oat Soda Bread - 101 Cookbooks
Irish Soda Bread - The English Kitchen
Brown Bread - David Lebovitz
Soda Bread - Farmersgirl Kitchen
Irish Soda Bread Scones - Brown Eyed Baker
Irish Soda Bread Scones - Smitten Kitchen
Caraway Soda Bread - Simply Recipes
Oats and Honey Irish Soda Bread with Raisins - Baking Bites

Lemon Chicken with Capers or Olives and Penne Pasta


From the kitchen of One Perfect Bite...This is a quick and simple recipe that's nice to have on hand when you want something hot and hearty for dinner. It was developed by Rachael Ray and my version of it closely resembles hers. I had originally intended to have a light supper tonight, but it appears that winter missed the memo regarding the arrival of spring, and, as the day turned stormy and cold, a heavier meal seemed more appropriate. So, water for pasta was put to boil, and chicken, originally intended for the grill, was chopped, and then sauteed with lemons and capers to form a light pasta sauce. This truly is a 30 minutes meal and the recipe is structured to allow you a couple of options. Lemon can be adjusted to personal taste and olives can be swapped for capers if you prefer them. While I used penne this evening, any pasta clearly will work here. Leftovers, while problematic, require special handling. The pasta absorbs the sauce, so, I add a can of mushroom soup when I reheat it. It really works quite well and day two pasta , while slightly different, is as tasty as the original meal. This is simple, hearty and a great fall back recipe. It won't appear on anyone's bucket list or be your final meal request, but it is nice to have on hand for dinner when you are very busy. Here's the recipe.

Lemon Chicken with Capers or Olives and Penne Pasta...from the kitchen of One Perfect Bite courtesy of Rachael Ray

Ingredients:
2 tablespoons extra-virgin olive oil
6 boneless, skinless chicken thighs cut into 1-inch pieces
Salt and pepper
1-1/2 tablespoons butter
2 tablespoons chopped garlic
1/4 cup finely chopped scallions
2 tablespoons all-purpose flour
1/2 cup white wine or dry white vermouth
2 to 4 tablespoons fresh lemon juice
1 cup chicken broth or stock
3 tablespoons capers or coarsely chopped kalamata olives, drained and rinsed
1/2 cup + 2 tablespoons flat-leaf parsley, chopped
12 ounces penne rigate pasta, cooked to al dente

Directions:
1) Heat a deep nonstick skillet over medium high heat. Add a tablespoon of extra-virgin olive oil and chicken to the pan. Season chicken with salt and pepper. Brown chicken until lightly golden all over, about 5 to 6 minutes. Remove chicken from pan. Set aside.
2) Return skillet to heat. Reduce heat to medium. Add another tablespoon extra-virgin olive oil and 1 tablespoon butter, garlic and scallions to skillet. Saute garlic and scallions 3 minutes. Add flour and cook 2 minutes. Whisk in wine and reduce liquid, about 1 minute. Whisk lemon juice and broth into sauce. Stir in capers or olives and 1/2 cup parsley. When liquid comes to a bubble, add remaining 1/2 tablespoon butter to sauce to give it a little shine. Return chicken to pan and heat through, about 1 to 2 minutes. Toss hot pasta with chicken and sauce and serve. Adjust salt and pepper, to your taste. Sprinkle with reserved 2 tablespoons chopped parsley. Yield: 4 servings.

You might also enjoy these recipes:
Pasta with Chicken and White Sauce - Jamie Oliver
Chicken and Bacon Pasta - Anne's Food
Bruschetta Chicken Pasta - Erin's Food Files
Chicken Spaghetti - The Pioneer Woman
Cajun Chicken Pasta - Dinah's Dishes
Chicken Pasta - Tastydays
Lemon Chicken Pasta - Everyday Cookin'
Easy Lemon Chicken with Pasta - Food Network
Lemon Chicken Pasta Salad - Food for My Family
Creamy Chicken and Mushroom Pasta - My Halal Kitchen
Pasta with Chicken and Asparagus - Simply Recipes

Peas with Onions and Mint


From the kitchen of One Perfect Bite...and because man cannot live by bread alone, it's time to feature a vegetable or two. I've been testing vegetable recipes for our Easter dinner. I found one in The Gourmet Cookbook that I really like. It's easy to do and it uses ingredients that can be found in any grocery store. It may surprise you to learn that the recipe calls for frozen, rather than fresh, peas. Those of you who are gardeners know that peas, particularly English peas, become starchy if they are not used shortly after they are picked. If you're not using peas freshly plucked from the garden, it is much better to go with the frozen variety. The Gourmet recipe produces a lovely side dish. I've altered it slightly because I think the ratio of onions to peas was too high. When you glance through the recipe you will see that the quantity of onions is given as a range. This is a case when I think less is more and I use the smaller amount. Be forewarned, that fresh mint is essential to the success of this recipe. I love the color this dish adds to the table. This recipe is so easy and inexpensive that there is no reason not to make it on a regular basis. I think those of you who try this dish will love it. Here's the recipe, which can, by the way, be doubled.

Minted Peas and Onions...from the kitchen of One Perfect Bite, adapted from The Gourmet Cookbook

Ingredients:

2 tablespoons unsalted butter
8 to 12 ounces sweet onions, halved lengthwise and thinly sliced crosswise
2 cups frozen green peas, thawed
2 tablespoons finely chopped mint
1/2 teaspoon salt
1/8 teaspoon pepper

Directions:
Heat butter in a 12-inch skillet over moderately low heat until foam subsides. Add onions, cover, and cook, stirring occasionally, until soft, about 8 minutes. Add peas, mint, salt and pepper and cook, stirring, until peas are heated through. Yield: 4 servings.

You might also enjoy these recipes:
Snap Pea Salad - Sense and Sensibility
Peas with Lettuce - Never Enough Thyme
Sauteed Peas with Mint - Chantel's Cooking Blog
Sugar Snap Peas with Mint Oil - One Perfect Bite
Simple Pleasures-English Peas - Bunky Cooks
Three Types of Peas with Bacon and Leeks - Sara's Kitchen

Rue Tatin Sweet Crescent Rolls


From the kitchen of One Perfect Bite...Every year at this time, I renew my search for the perfect cinnamon roll. I've been looking for decades now and still come up short. I've finally decided that the only way I'll ever find my golden fleece, is to rob elements of existing recipes, and combine them in such a fashion that they can be called my own. Tonight's post is not about cinnamon rolls, it is, rather, about an outstanding sweet dough that I think will work very nicely as a base for them. I know most of you have read the charming memoir, On Rue Tatin, written by Susan Loomis. Tucked between its covers is a lovely recipe called Les Pains De Rapprochement or The Rolls That Brought us Together. That dough is the one I'll be using next week when I feature the world's ultimate cinnamon roll. They are really good and I think you forgive my modest brag when you taste them. Anyway, I tested Susan's recipe exactly as it was written before forging the path that will lead all of us to those very special rolls. The Silver Fox loved the basic recipe and was charmed by the shape and color of the rolls. It is at his urging that I'm sharing the original recipe for her crescent rolls with you. These are really easy to do, especially if you have a large stand mixer to do the work for you. The dough requires a bit of kneading, but it is so velvety in hand that that is a pleasure to do. These are really nice. They are meant to be served warm from the oven, but they can be reheated in a microwave if needs be. There are no tricks here. Follow the recipe and you have gorgeous crescent rolls to serve your family and friends. I hope you'll come back next week when we feature them with added bells and whistles. Here's the basic recipe.

Sweet Crescent Rolls...from the kitchen of One Perfect Bite courtesy of Susan Herrmann Loomis

Ingredients:
1 cup whole milk
8 tablespoons (1 stick) unsalted butter, at room temperature
2-1/4 teaspoons (1 package) active dry yeast
1/2 cup granulated sugar
4-1/2 cups all-purpose flour
2 large eggs, room temperature
1 teaspoon table salt

Directions:
1) Scald milk over medium-high heat. Pour it into large bowl of an electric mixer. Add butter and stir until butter has melted. Set aside until mixture is lukewarm.
2) Stir yeast and sugar into milk. Add 1 cup flour and mix well. Add eggs, one at a time, beating well after each addition. Add salt and 1 more cup of flour. Mix vigorously until dough is smooth and elastic, about 3 minutes on medium speed.
3) Add reserved 2-1/2 cups flour and mix just until incorporated. Turn dough onto a lightly floured surface. Continue kneading by hand until it is smooth.
4) Place dough in a bowl, cover with a towel or plastic wrap and set aside until it has doubled in size, about 2 hours.
5) Lightly flour 2 baking sheets.
6) Turn dough onto a well-floured surface, divide it in half, and roll each half to form a circle that is 1/8-inch thick and 16-inces in diameter. Cut each circle into quarters, and cut each quarter into 4 wedges, Roll edges up, beginning at the wide end, to form crescents.
7) Place rolls on prepared sheets, leaving 2-inches between them and arranging them with tips tucked underneath. Cover rolls with a kitchen towel and let rise until they have doubled in size, at least 4 hours.
8) Preheat oven to 350 degrees F.
9) Bake rolls in center of oven until they are golden, 10 to 15 minutes. Remove and serve immediately. Yield: 32 crescent rolls.

You might also enjoy these recipes:
Dark and Soft Restaurant Dinner Rolls - Handle the Heat
Olive and Asiago Rolls - Cookie Madness
Soft Whole Wheat Rolls - One Perfect Bite
90 Minute Dinner Rolls - Drick's Rambling Cafe
Sour Dough Dinner Rolls - Phoo-d
Potato Dinner Rolls - Sweet and Savory Tooth
Parker House Rolls - The Pioneer Woman
Soft Dinner Rolls - Inspired2Cook

This post is being linked to:
Wild Yeast - Yeast Spotting

Fried Onion Rings


From the kitchen of One Perfect Bite..."Take it outside." While these words usually preclude a bar brawl, they were meant only to clear the kitchen and get the steaks on the grill so our annual steakhouse dinner could proceed apace. We are generally cautious eaters, but tonight's meal centered on thick, aged sirloins, steakhouse fries, creamed spinach and the meal's highlight, deep fried onion rings. The steakhouse dinner is really an excuse to serve these extraordinarily good onions. They are simple in the extreme, and once you've had them, you'll view all other versions as poorly executed pretenders. Save for the onions and the oil in which they fry, there are only three ingredients in this recipe, those being milk, flour and salt. The instructions are equally simple and can be summarized as a process of dipping, dusting, dunking and draining. If there is a drawback to this recipe, it's that the onions must be fried just before serving. They lose their crispness as they sit and cool, but they will make your socks go up and down when they are served hot. The predominant flavor is that of a sweet onion and the coating is just thick enough to provide a little crunch. I do hope you try these. They are delicious. Here's the recipe.

Fried Onion Rings...from the kitchen of One Perfect Bite inspired by Gormet Magazine

Ingredients:
6 cups vegetable oil for deep frying
1 large (1 pound) sweet onion, cut crosswise into 1/4-inch thick slices
1 cup whole milk
2 cups all-purpose flour
1 teaspoon salt

Directions:
1) Heat oil in a 4 to 5-quart heavy pot or a wok set over moderate heat until oil temperature is 370 degrees F.
2) While oil heats, divide onion slices into rings. Pour milk into a bowl and combine flour and salt in a pie plate. Working in small batches of three, dip rings into milk and then into flour; repeat for a double coating. Transfer rings to hot oil and fry, stirring, until rings are golden brown, about 2 minutes. Carefully transfer rings to paper towels to drain. Coat and fry remaining rings in same fashion. Serve immediately. Yield: 4 servings.

You might also enjoy these recipes:
Roasted Onions Momofuku Style - Momofuku for 2
Trencherman's Onions - One Perfect Bite
Cheese Scalloped Onions - The English Kitchen
Sweet and Sour Onions - Simply Recipes
Baked Barbecued Onion Rings - Recipe Girl
Roasted Cipollini Onions - White on Rice Couple
Onion Gratin with Rosemary and Thyme - Kalyn's Kitchen

FAVORITES OF FASHION WEEK

Here are some of my favorite looks from some of my favorite designers at fashion week!
wish i could own all this stuffff!!

VENA CAVA


TOPSHOP UNIQUE


THE ROW


RODARTE


RACHEL COMEY


PROENZA SCHOULER


PAUL SMITH


NANETTE LAPORE


MARC BY MARC JACOBS


HOUSE OF HOLLAND


HELMUT LANG


ALICE + OLIVIA