Peanut Butter and Banana Bread


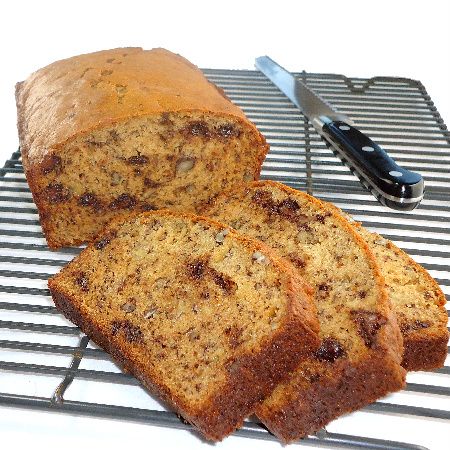
From the kitchen of One Perfect Bite...I wish all delicious things could be beautiful and appealing to the eye. Unfortunately, it doesn't always work that way. This quick bread is a perfect example of what I mean. It is wonderfully moist and flavorful, but it is homely in the extreme, and when these ingredients are used, there's not much that can be done to improve its appearance. The combination of bananas, peanut butter and chocolate is irresistibly tasty, but as you can see, they turn the batter a blotchy, muddy tan that is less than pleasing to the eyes. I normally wouldn't bother with something like this, but the bread has such outstanding flavor, that I keep granting it clemency, and bake it over and over again. The recipe was developed by Beth Lipton and I found it at the library in her book, You Made That Dessert?. I really like the earthiness of this bread and I recommend it to you, but with a caution or two. First, do not attempt to make this with natural peanut butter. It is too thin to work as a butter replacement in this recipe. Second, avoid using regular chocolate chips if you can. They will blotch more than the miniatures as the loaf bakes and you'll end up with a hot mess on your hands. Last, and, most important of all, the bread should sit for a day before it is eaten. The flavor improves remarkably when it's given the opportunity to ripen. This is a moist loaf and it keeps well if properly wrapped. I think you will like this. Here's the recipe.


Peanut Butter and Banana Bread with Chocolate Chips and Walnuts ...from the kitchen of One Perfect Bite courtesy of Beth Lipton


Ingredients:

1-1/4 cups all-purpose flour

1 teaspoon baking soda

1/2 teaspoon salt

1/2 cup creamy peanut butter (do not use "natural")

2/3 cup sugar

3 large ripe bananas, mashed

2 large eggs, at room temperature, lightly beaten

1/2 cup chopped walnuts or chopped pecans (optional)

1/2 cup miniature chocolate chips (optional)


Directions:

1) Preheat oven to 350 degrees F. Mist a 5 x 9-inch loaf pan with cooking spray.

2) Whisk flour, baking soda, and salt together in a small bowl until combined.

3) Place peanut butter and sugar in a large bowl. Beat with an electric mixer on medium-low speed until well-blended, about 2 minutes. Beat in mashed banana and eggs; mix well.

4) Using a wooden spoon or flexible spatula, stir flour mixture into the peanut butter–banana mixture, mixing until just combined, scraping down sides of the bowl as needed. Stir in chopped nuts and/or chocolate chips, if using. Scrape batter into the pan and smooth top.

5) Bake 45 minutes. Cover pan loosely with foil and bake 10 to 15 minutes longer, or until a toothpick inserted in center of loaf comes out clean. Cool bread on a wire rack for 10 minutes before removing from pan. It helps to run a paring knife around edges of pan to loosen bread before turning it out. Invert bread onto a wire rack. Carefully turn bread right-side up. When cool, slice and serve. Yield: One 9-inch loaf. Serves 8.


One Year Ago Today: Peanut and Pumpkin Soup


Two Years Ago Today: Apple Custard Pie with Streusel Topping


Your might also enjoy these recipes:

Banana-Applesauce Bread - My Kitchen Adventures

Wonderful Pistachio and Banana Bread - Nibbles and Feasts

Vegan Mango and Banana Bread - The Sweets Life

Orange-Glazed Banana Nut Bread - One Perfect Bite

Marbled Banana Nutella Bread - Sugar Plum

NEW WEBSITE

we've moved!


follow us at www.bestcoast.us

Scandinavian Shrimp Salad


From the kitchen of One Perfect Bite... This lovely salad is inspired by those that are served in Scandinavia during the summer months. I classify it as a summer salad because it uses fresh dill heads and they are a seasonal ingredient. The heads, seen to the left, are more strongly flavored than the feathery fronds you can always find in your grocer's produce aisle. They are used primarily for pickle making. They have a wonderful fragrance that is as easily identifiable as that of tarragon or cilantro. The salad defines simplicity, both in its use of ingredients, and the effort required to make it. Cooked shrimp, from the fish market, can be used to make it if you are running short of time. I tend to use less mustard in this dish than many others do. I like dill to be the dominant background flavor in this salad and it already has to compete with the strong flavors of the cornichons and capers. A little mustard, here, will go a long, long way. We are talking shrimp, not hot dogs. I like to serve the salad as a topper for open faced sandwiches. It can, of course, also be served on a bed of lettuce if you would prefer. I know those of you who try this salad will love it. The shrimp and cucumbers give it lovely texture and it is truly a gift from the sea. Here's the recipe.


Scandinavian Shrimp Salad...from the kitchen of One Perfect Bite inspired by Bon Appetit


Ingredients:

1/3 cup mayonnaise

1 tablespoon water or stock

1/4 cup fresh dill heads, chopped

1 to 3 teaspoons Dijon mustard

1 tablespoon fresh lemon juice

1 pound medium-size shrimp, peeled, deveined and cooked

1 cup sliced English cucumbers, halved lengthwise and cut crosswise into thin slices

1/3 cup cornichons (gherkins), sliced

1 tablespoon capers, drained and rinsed


Directions:

Thin mayonnaise with water or stock. Add dill, Dijon mustard to taste and lemon juice; whisk to combine. Add shrimp, cucumber, cornichons and capers; toss to coat. Season generously with salt and pepper. Yield: 4 servings.


One Year Ago Today: Black Bean Burritos


Two Years Ago Today: Blue Cheese Steak Sandwiches


You might also enjoy these recipes:

Chilled Calamari Salad with Lemon and Parsley - Gina's Skinny Recipes

Santa Barbara Salad - Ciao Chow Linda

Debo's Seafood Salad - Christine's Pantry

Tequilla Lime Crab Salad - Hugging the Coast

Crab Salpicon - The Winter Guest

Challenge 48 - Tipper Week

Good Morning Top Tippers
Are you ready for another fab challenge this week?

Don't forget our Birthday Bash is getting closer - 6th Sept - What will our challenge be? You decide...Vote NOW...£100's of prizes...Don't miss out!!!


Tipper Week


We on the TTT DT love our Tipper Weeks - it's when we get to share with you our favourite tips!

But don't forget we'd love you to share your Top Tips with us too
Write your Top Tip in your blog post, link the post adding (TIP) after your name and if you make a project using our theme too you'll get the chance of 2 prizes!!!


This Week's Challenge


'Masculine Card'

 
++++++++++++++++++++++++++++++++++++++++++++++++++++++++++++++++++++++++++++++++++


Random.Org Prize............


 Stamp and Create is a fairly new on-line store.
We specialize in Rubber Stamps and Scrapbook supplies. Some of the companies we carry are: Wags 'n Whiskers Rubber Stamps, High Hopes Rubber Stamps, Whiff of Joy, The Greeting Farm, Penny Black clear stamps, Kraftin' Kimmie Stamps, Stampavie, My Heart Stamps for You, Basic Grey, Ribbon, Charms, Shimmerz, and more!


***************************************************************************


Top Tipper Prize............

Stash Books


celebrate handmade


who is offering our featured tipper an amazing book:


Stash Books is an imprint of C&T Publishing located in the San Francisco Bay Area. If you’re craving beautiful authenticity in a time of mass-production…Stash Books is for you. Stash Books is a new line of how-to books celebrating fabric arts for a handmade lifestyle. Backed by C&T Publishing’s solid reputation for quality, Stash Books will inspire you with contemporary designs, clear and simple instructions, and engaging photography.


************************************************************


Now onto the Top Tip Tuesday Design Team's Masculine projects and Top Tips...


Heike


Tip:
When using punches, turn them upside down, so you can see what you're punching through the hole in the bottom of the punch!


Maggie
Tip:
When heat embossing, gently rub the surface with anti-static bag to remove fingerprints and prevent stray pecks of powder.


Tip:
For a "guy card" use twine or raffia instead of ribbon.  It feeds the need to embellish without the risk of making the card too "girlie".


Tip:
Masculine cards can be difficult to make; however,
 if you include a joke, power tools and a plumber's butt...you can't go wrong!


Bettina
Tip:
When You are creating a background for your stamp, make sure you place the stamp first and then cover it up before you're stamping on it ;)


Tip


#1 - Nesties look great horizontally and vertically together.
#2 - If there is a pattern in clothes or stamp, try to choose DP with the same pattern to coordinate


Tip:
Always think odd!
The human brain likes to 'group' things, so when adding gems (or any other embellishment) always use odd numbers - that way the human eye will see one group of 3 rather than 2 groups of 2! This works for anything visual - crafting/gardening/etc.


Tip:
#1 - Hand sew your buttons on with jute/twine,
They wont pop off in the post, and this looks better on masculine cards.
#2 - Use a kitchen sponge... like the ones that have the green scourer, to stipple your sky.


Elaine
Tip:
Male cards don't need to be dull and drab colours, try some bright and cheerful tones.


Tip:
#1 - Dip the ends of ribbons very lightly into wet craft glue to 'seal' the cut ends and let it dry before adding to your projects.  It will dry clear so you will not see it, but it will prevent the ends of the ribbon from fraying.
#2 - For a more 'masculine' bow, just tie a knot in a ribbon and pull the ends out flat rather than tie an actual bow.


Tip:
Ground your image by adding a shadow on the floor; so that they do not look like they are floating in the air.


Tip:
Using a Digi image and find it smears?!
Why not spray a bit of cheep hair spray over the top to stop the smudging!


Winners for Challenge #47


Good Morning Everyone........

Did we love Maggie's Centre Step Card last week - wasn't it fab!


And you wonderful Top Tippers created some stunning Thank You projects too :)

On to the winners...


Our 1st Prize is...


Inky Impressions is a rubber stamp company carrying images of the cutest little girls and animals. The inspiration of the stamps comes from the owner Nicole's little girl, MarLeigha (LiLi).  Each Wednesday Inky Impressions has an Inky challenge hosted by their own Inkettes and if you participate each week, you are eligible to win a special goodie bag from the store at the end of the month. You can also catch some daily inspiration from all of the Inkettes on the Inky Impressions Inspirational Blog!
 Come play along with the fun and get inky..we dare ya!"


And the lucky winner as chosen by Random.org is......


********************************************


This week we had quite a few Tip leavers who didn't mention their tip was for TTT in their post and some who also didn't add 'TIP' after their name when linking :(
We considered ALL tips left in blog posts this week but from now on will ONLY enter those tips linked correctly and who specify in their post that the tip is for TTT.

_________________________________


And this week's Top Tipper Prize...


who are offering one lucky winner £10 gift voucher to use in their shop.


DewDrop Craftz is a UK online company specialising in digital images with a difference and other crafting goodies.  Authorised distributors of the fantastic Cougar electronic cutters and Foil Master machines.  Now also stocking wall art and tile art - that something a little different to add to your home.


Each week we love you to leave tips!
It couldn't be easier...
Write a Top Tip in your blog post, link that post to Mr Linky with a picture and add (Tip) after your name...
Next time YOU could be the winner!


Top Tip Tuesday's Top Tipper this week is...

Whose fab Top Tip is...


"To add interest to the little squares [an image cut into inchies] and save time: digitally draw a square frame around the cropped sections and space them evenly before you print, then you won’t have to cut each one and mat it separately. Just color and cut neatly around the all four and your grouping is all ready to go."

Well done ----- Great tip!


********************************************

Thanks so much to everyone who left a Top Tip on their blog and linked it with (TIP) after their name...We are all be banking some fabulous tips each week :)


********************************************


Congratulations girls!

Please contact us at toptiptuesday@hotmail.co.uk to claim your prize!
(In the subject line please write which prize you are claiming)

Either copy & paste the address into your e-mail or use the direct link in the RULES AND CONTACT INFO tab at the top of the page


********************************************************


Ok so this weeks Top 3 in numerical order...


Beautiful image, beautifully coloured - we all loved the rose too :)


33 - sherryn
Such a fab Centre Step Card - glad you enjoyed the tutorial :)


35 - Delphine

Beautiful colours here and the image is coloured to perfection - look at the 'hue' around her - gorgeous!


********************************************

Congratulations to all of our winners - please make sure that you take your badges and show them off on your blogs :)

Thank you for stopping by - make sure you come back later for this weeks fabulous tutorial/challenge.


Scandinavian-Style Cucumber Pickle


From the kitchen of One Perfect Bite...I am, by disposition, easily moved to laughter or tears and I have an unusually expressive face. It takes no special training to sense my mood or humor, but every once in a while I fool everyone. I mention this, because last weekend I was moved to tears by something quite extraordinary. Bob and I make it a point to attend local celebrations and festivals. These events were originally created to celebrate family, community and heritage, and we like to honor that spirit whenever we can. Last weekend, one of the towns close to us held their annual Scandinavian Festival and we happily attended. Usually, the entertainment consists of folk dancing and music from Finland, Norway, Denmark or Sweden. The dancers are members of groups that meet bi-monthly for practice and some of them are very good. They are, however, amateurs. What makes them special is the participation of families who often have three generations on stage for any given performance. Despite the participation of families, the number of dancers dwindles every year. There, obviously, are not enough young people to replace the seniors who can no longer participate. It's sad to see the passing of a tradition, but we enjoy it while we can and applaud the efforts of those who try to preserve memories of the old ways for their children. We sat through a handful of dance performances before heading to the beer garden to sample some typically Scandinavian food and drink. We never made it. A men's chorus, about 50 members strong, had taken the stage and, as they began to sing, it was clear we were in for something special. These were not young men, and I'd guess the youngest of them to be my age. That meant the group had lots of time to practice and perfect their singing, and perfect it they had. As they sang, my throat started to knot, but I kept my act together until the end of their performance when they began to sing the Finlandia hymn. As they sang, an elderly group in the back of audience stood and joined hands. Some of them were moved to tears and as I watched I, too, began to cry. Now it was a sedate cry, mind you, but the tears were very real. I was moved by the haunting beauty of the music and their obvious remembrance of times and places once well known but never more to be. I think you might understand the emotion if you listen to this small portion of the Finnish national anthem. It is quite beautiful.


Now, because this is a food blog, I can't let you go without sharing a recipe. It's time for us to move from the sublime to the ridiculous. Actually, there will be two new Scandinavian recipes, but only one of them will be featured today. This is a cucumber pickle that is lovely to serve with dishes as diverse as barbecue or Swedish meatballs. It is amazingly easy to make, and, as long as you thinly slice the cucumbers, you can't go wrong. Ideally, the dish should be made with seedless cucumbers, but as you can see I break my own rules. I know you'll enjoy these. Here's the recipe.


Scandinavian-Style Cucumber Pickle...from the kitchen of One Perfect Bite courtesy of Gourmet magazine


Ingredients:


1 English cucumber

1/2 cup white-wine vinegar

3 tablespoons sugar

1 tablespoon finely chopped fresh mint leaves

1 tablespoon finely chopped fresh parsley leaves

1/2 teaspoon salt

1/4 teaspoon freshly ground black pepper


Directions:

Cut cucumber crosswise into very thin slices (preferably using a manual slicer). In a bowl whisk together remaining ingredients until sugar is dissolved and add cucumber, tossing to coat. Marinate cucumbers, covered and chilled, stirring occasionally, 4 hours. Yield: 10 to 12 servings.


One Year Ago Today: Chapatis and Pooris from One Dough


You might also enjoy these recipes:

Ottolenghi's Cucumber Salad with Poppy Seed Salad - Nami-Nami

Cucumber Salad - Simply Recipes

Greek Salad Cucumber Bites- Recipe Girl

Sweet and Sour Cucumber Salad - Kalyn's Kitchen

Cucumber Salad - For the Love of Cooking

Roasted Fennel and Peppers


From the kitchen of One Perfect Bite...One of the treasures of late summer is the abundance of expensive vegetables that can be purchased for pennies on the dollar in local markets. Fennel, leeks and peppers come to mind. As autumn takes hold, they will again soar in price, but for now, they can be enjoyed with abandon. My kitchen tends to track the seasons, and when these vegetables appear in farmer's markets, I know its time to pull my French and Italian recipes from storage and start to fix some of our favorite Mediterranean meals. It's still too warm for the heavier braises, but there are loads of lighter dishes that work really well and help to bridge the seasons. Today's recipe is one of them. I served this tonight with a simple roast chicken and some thickly sliced heirloom tomatoes. Nothing more was needed. This is a strongly flavored dish that will not appeal to all tastes, but if you have fond memories of the food of Provence and Tuscany, you are in for a real treat. While some chopping is involved, this is a easy dish to prepare, and, if you have even meager knife skills, you can have it on the table in an hour. This dish works well with plain grilled meats and roasts, as well as chicken. I think most of you will enjoy this side-dish. Here's the recipe.


Roasted Fennel and Peppers...from the kitchen of One Perfect Bite courtesy of Healthy Cooking Magazine


Ingredients:


2 large fennel bulbs, halved and sliced into 1-inch pieces

2 medium sweet red peppers, cut into 1-inch pieces

1 medium onion, cut into 1-inch pieces

3 garlic cloves, minced

1 tablespoon olive oil

1/2 teaspoon salt

1/2 teaspoon pepper

1/2 teaspoon rubbed sage

Fresh sage leaves, thinly sliced, optional


Directions:


1) Preheat oven to 425 degrees F.

2) Place fennel, peppers, onion and garlic in a 15-in. x 10-in. x 1-in. baking pan coated with cooking spray. Drizzle with oil; sprinkle with salt, pepper and rubbed sage. Toss to coat.

3) Bake, uncovered, for 20-25 minutes or until tender, stirring twice. Garnish with fresh sage if desired. Yield: 6 servings.


One Year Ago Today: Chiang Mai Curry Noodles with Chicken


You may also enjoy these recipes:

Roasted Beets - Delicious Obsessions

Roasted Cauliflower - Nutritious Eats

Roasted Vegetable Medley with Rosemary Thyme - Savoring Today

Roasted Vegetables with Feta - In Flora's Kitchen

Roasted Asparagus - Foodie Journey


This post is being linked to:

Smiling Sally - Blue Monday

Yvonne- StoneGable - What's on the Menu Monday

French Lemon Tart and Pâte Sablée


From the kitchen of One Perfect Bite...This lovely tart will raise an eyebrow or two. It combines a copious amount of lemon juice with a scant measure of sugar to produce a puckery custard that contains no butter or lemon zest. The finished tart is ambrosia for those who love lemon desserts and it is a boon for busy cooks. The tart filling contains just four ingredients, and the recommended pastry shell, a pâte sablée, can be made in a food processor and patted into place. If you are pressed for time, a ready-to-roll commercial pie crust can also be used. Please don't ask how I know that. This is a wonderful company or family dessert. It is not too sweet and it has glorious color. The recipe comes from Bistro Cooking by Patricia Wells. The tart lacks the height and sweetness of a standard lemon pie, but its wonderful flavor and spare simplicity will please the palate of any Francophile. You might want to serve this with macerated berries or a dollop of whipped cream. Here's the recipe.


French Lemon Tart - Tarte au Citron Madame Cartet...from the kitchen of One Perfect Bite courtesy of Patricia Wells, Bistro Cooking


Ingredients:

2/3 cup fresh lemon juice (about 4 lemons)

1/2 cup sugar

3 tablespoons creme fraiche or heavy cream

5 large eggs

1 pâte sablée shell (see below), pre-baked and cooled


Directions:

1) Preheat oven to 375 degrees F.

2) Combine lemon juice, sugar and creme fraiche in a large bowl. Whisk until well blended. Add egg, one at a time, beating well after each addition.

3) Pour lemon cream into prepared shell. Bake until firm, about 15 to 20 minutes. Remove from oven and place on a rack to cool. Serve at room temperature . Yield: 8 servings.


Pâte Sablée...from the kitchen of One Perfect Bite courtesy of Patricia Wells Bistro Cooking


Ingredients:

1 cup all-purpose flour (do not use unbleached)

6 tablespoons unsalted butter, chilled and cut into pieces

1/8 teaspoon salt

1/2 cup confectioners' sugar

1 large egg, lightly beaten


Directions:

1) Place flour, butter,salt and sugar in bowl of a food processor. Process just until mixture resembles coarse crumbs, about 10 seconds. Add egg and pulse just until pastry begins to hold together, about 20 times. Transfer the pastry to waxed paper. Flatten dough into a disk.

2) Dust fingers with flour, then, working very quickly with just your finger tips, press dough into a 10-1/2-inch loose bottomed black tin tart pan. I used a 9-inch tart pan. Press dough up sides of shell and crimp evenly. Cover carefully with plastic wrap or foil. Refrigerate for 2 to 3 hours.

3) Preheat oven to 375 degrees F.

4) Prick bottom of shell with tines of fork. Line shell loosely with heavy-duty foil, pressing well into edges so pastry will not shrink while baking. Fill with baking wights or dried beans to prevent shrinkage. Bake just until pastry begins to brown around edges and seems firm enough to stand up by itself, about 20 minutes.

5) For a partially baked shell: Remove weights and foil and continue baking until lightly browned all over, about 10 minutes more. For a fully baked shell: Remove weights and foil and bake for an additional 20 minutes. Watch carefully to prevent burning. Cool for at least 10 minutes before filling. Yield: 1 pastry shell.


One Year Ago Today: Grapefruit Sorbet


Two years Ago Today: Swedish Meatballs


You might also enjoy these recipes:

Northwest Lemon Tart - Step By Step Gourmet

Strawberry Lemon Tarts and More - Pantry Eats

Luscious Lemon Tart - Flour Me with Love

LemonTart (from Joy of Baking) - Life of a Foodie and Her Family

Lemon Curd Tartlets with White Chocolate - Sweet Sensations

Pasta with Bread Crumbs and Herbed Tomatoes


From the kitchen of One Perfect Bite...I had more than a passing encounter with Mother Hubbard's dilemma today. I've been madly preparing for an extended trip to the coast and dinner time rolled around with packed suitcases but nothing more for dinner than a defrosted steak that desperately needed something to keep it company on the plate. The cupboard was, indeed, nearly bare and I wasn't up to a last-minute grocery shop. It was obviously going to be a make-do supper. That occasionally happens here, and, when it does, I have a handful of recipes that I fall back on. This is one of them. I make this dish once or twice a year when I have stale bread and ripe tomatoes that must be used. It's not my favorite recipe, but it is serviceable and makes a really nice accompaniment to plain grilled meat or chicken.I routinely use stale bread to make crumbs and usually have a supply in the pantry. Because I have them in ready status it takes only minutes for me to make this pasta. If you are going to make crumbs just for the pasta, it will take about an hour for them to properly dry and toast, so plan your time accordingly. I've included instructions for preparing crumbs in today's recipe. If you make the recipe from start to finish you will need a couple of hours to put everything together. An easy shortcut is the use of panko bread crumbs. If you use a gentle hand, panko has enough substance to stand in for homemade crumbs. If you use them, you would begin with step 3 in the recipe below. This is really easy to make, and, if ever you are in need of a quick go-with, you might want to try this pasta. Here's the recipe.


Pasta With Bread Crumbs and Herbed Tomatoes...from the kitchen of One Perfect Bite


Ingredients:


1/2 large loaf country-style bread, crust removed

1/4 cup + 1 tablespoon extra-virgin olive oil

3 cloves, chopped

6 large, ripe, Roma tomatoes, cored, peeled, seeded, and chopped

1/2 bunch fresh parsley, chopped

1/4 cup fresh basil leaves, chopped

3 sprigs fresh thyme leaves, chopped

Salt and freshly ground black pepper to taste

Balsamic or red wine vinegar to taste (optional)

12-ounces dried fusilli or other short tubular pasta


Directions:


1) Preheat oven to 275 degrees F.

2) Cut bread into pieces. In a food processor fitted with the metal blade, process bread, in batches, to coarse crumbs. There will be about 3 cups of crumbs. Spread in a shallow baking tray and toast in the oven for 1 hour, or until dry and crisp but not brown.

3) In a large saute pan, heat olive oil over medium heat. Add bread crumbs and garlic and cook, stirring constantly, for 10 minutes, or until crumbs are golden. Pour into a bowl and set aside.

4) In a glass or ceramic bowl, combine tomatoes and chopped herbs. Season to taste with salt and pepper. Add a splash of vinegar to intensify flavor of the tomatoes, if you desire.

5) In a large pot, bring 4 quarts of salted water to a boil over high heat. Cook pasta per package directions until al dente. Drain well.

6) Transfer pasta to a warm, shallow serving bowl. Toss with reserved 1 tablespoon olive oil. Pour tomatoes over top and toss to combine. Add bread crumbs and toss again. Serve immediately.

Yield: 4 to 6 servings.


One Year Ago Today: Mexican Rice


Two Years Ago Today: Biscotti Regina


You might also enjoy these recipes:

Linguine with Heirloom Tomatoes - Life's Ambrosia

Best Summer Pasta with Roasted Cherry Tomatoes - Stacey Snacks

Summer Sweet Corn Pasta - So Tasty, So Yummy

Caprese Pasta Salad - A Girl in Her Kitchen

Pasta Salad with Grape Tomatoes and Mozzarella - Alida's Kitchen

Fresh Tomato Pasta with Herbed Bread Crumbs Montreal - Savoring Time in the Kitchen