
Morning everyone!
OMGosh - I can't believe that we had 427 entries into last weeks competition - the team and I were shocked at the amount of wonderful entries!!
This week our tip to share with you is how to make a WordArt book!! How fab is that? Therefore, our challenge this week is:
All Sentimental
Your creation MUST have a sentiment on the front! It can be Happy Birthday, Get Well, Thank You - anything at all!! Another easy peasy challenge!!
Also, to go along with our new look blog, we have decided that we are going to start picking a Top 3 as we see so many amazing creations, we wanted to acknowledge all those that we find inspirational each week.
Good Top Tip Tuesday to you all :)
Carol here ......
Today I am sharing a tutorial with you that I originally wrote over 2 years ago - I have recently re-written it and hope you will all have a go :)
We are being sponsored by some amazing new companies again this week
This weeks random.org winner will receive:
Today I am sharing a tutorial with you that I originally wrote over 2 years ago - I have recently re-written it and hope you will all have a go :)
We are being sponsored by some amazing new companies again this week
This weeks random.org winner will receive:

Pink Cat Studio are offering one lucky winner 5 digis of their choice.
Pink Cat Studio is all about offering fun and whimsical stamps to inspire your creativity. They have a huge selection of super cute digi and rubber stamps to choose from and they add more each week. Owner and artist Melissa started PCS in 2005 and over the years nothing has excited and inspired her more than to see your creations with her stamps. Melissa’s goal is to continue to delight & surprise you with her designs. Stop by the studio today and get in on the fun!
Featured Tipper Prize


This week's Featured Tipper sponsor is Catherine Pooler, Stampin' Up! Independent Demonstrator.
Visit her website for daily inspiration! Be sure to sign up for her e-mail newsletter to get subscriber-only projects, tutorials and a sign up gift. You can shop her Online Store to get your Stampin' Up goodies delivered straight to your door!
Catherine is giving out a fabulous prize - One Free Month Subscription of Club Inbox! Members get exclusive videos and tutorials teaching you techniques, seasonal projects, cards and more. All projects are new and are exclusive to club members.
I'd also like to offer an extra little prize to one person this week.
Make a WordArt Book following my tutorial, after linking it as normal, add a comment to let me know that you followed my tutorial along with any feedback for future ones I may write. I will choose a winner next Tuesday evening and offer the choice of one of my many new and unused stamps (and I'm sure some other bits to play with will find their way into the package!)
(I am aware that there are commercially available templates for similar books but I have never purchased one - this tutorial was written before I'd seen them on the market)
WordArt Book
WordArt is available on all versions of Microsoft Word. Your icon may be in a different place on your screen to mine – but it will look the same...
...A capital ‘A’ in blue.
(Highlighted with a red box within the PrintScreen Image)

Open a Word document (A4 size)
Click on the WordArt icon and insert your chosen word into WordArt using the ‘default’ WordArt Style

*************************************************************************
Stretch your word to fit ½ of the page.
Hold cursor over your word – left click mouse – choose ‘Show WordArt Toolbar’.
Click onto ‘WordArt Character Spacing’, which is depicted by an ‘AV’ with a double ended arrow below – Choose ‘Tight’.

************************************************************************
Notice the letters are now a little tighter? This WILL make a difference to your completed template ;)
Hold down ‘Ctrl’ key, holding your cursor over the word, click and hold left mouse button and drag your word. You will see the cursor with a ‘+’ sign whilst dragging the word, dotted lines show where the word is until you let go of the ‘Ctrl’ and mouse buttons. This gives you an EXACT copy below the original….. You now have 2 templates exactly the same.

***********************************************************************
Print this page as many times as you need to give you 1 template for each letter.
Cut the templates out starting with just the first letter. Each template increases by a letter.

**********************************************************************
You can now use these templates on your chosen card. As well as drawing and cutting around the letter make sure you clearly mark and then cut all along the top and bottom of each piece – don’t worry about the left hand edge at the moment, leave this as ‘long’ as possible.
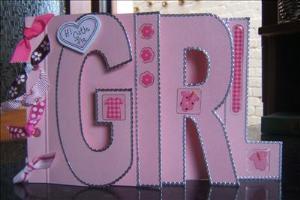
Once you have all pieces cut out position your letter pages together as you would like them to look in your book. At this stage the left hand edges will probably be different lengths – that’s fine – get the letters looking good and then holding them together firmly, cut through them all making your left hand edge even (you’ll probably want to tidy them up individually with your guillotine). You need to leave a gap of a few cm’s before the first letter to fix all pieces together, thus making the spine (the last picture of the ‘BABY’ WordArt Book standing explains this last paragraph a bit more!)
Decorate the pages before fixing them together. I use Peel Offs to outline the letters. There are many ways you can fix your pages together…DST, Brads, Eyelets, etc…
Here are a few of my completed WordArt Books…


Isn't that an absolutely fabulous tutorial? I always wondered how these were made, so I am soooo gonna give this one a try!!
Now onto some inspiration from Team Number One!
Maggie

Dawn

Elaine

Anne

Samantha

Eileen


Remember, all you have to do to win a prize is:
- Create something using the theme of the challenge
OR - leave a tip (using the comment section)
OR - do both!!
You can now only enter the challenge 3 times - just as long as its a new creation - any back dating creations (before today's date) will be removed.
You must also do a link to Top Tip Tuesday on your creation post.
Only someone leaving a tip can win the featured tipper prize - you can leave your tip via the comment section of the post.
Remember, there is also the chance to be one of our Top 3 creations as well!!
Thanks for stopping by and we can't wait to see your fabulous creations!!!


